Asus P4T P4T User Manual - Page 25
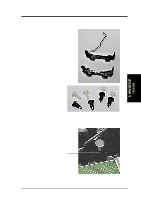
CPU Heatsink Retention Module Installation
 |
View all Asus P4T manuals
Add to My Manuals
Save this manual to your list of manuals |
Page 25 highlights
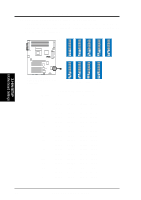
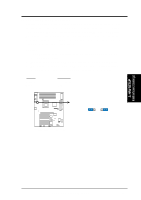
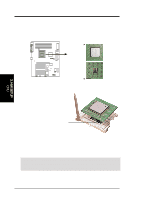
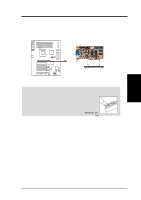
3. HARDWARE SETUP 3.6.2 CPU Heatsink Retention Module Installation Parts Inventory: 1. Two black plastic heatsink support braces have built-in retaining clips. 3. H/W SETUP Heatsink 2. Four black plastic collars and four white plastic plugs. Step 1: Mount the Heatsink Support Braces: 1. Mount the heatsink support braces: insert the four black plastic collars from the top through to the bottom of the motherboard. Insert the white plastic plugs into the middle of the black plastic collars and pop them firmly out the bottom of the motherboard. ASUS P4T User's Manual 25
-
 1
1 -
2
-
3
-
4
-
5
-
6
-
7
-
8
-
9
-
10
-
11
-
12
-
13
-
14
-
15
-
16
-
17
-
18
-
19
-
 20
20 -
 21
21 -
 22
22 -
 23
23 -
 24
24 -
 25
25 -
 26
26 -
 27
27 -
 28
28 -
 29
29 -
 30
30 -
31
-
32
-
33
-
34
-
35
-
36
-
37
-
38
-
39
-
40
-
41
-
42
-
43
-
44
-
45
-
46
-
47
-
48
-
49
-
50
-
51
-
52
-
53
-
54
-
55
-
56
-
57
-
58
-
59
-
60
-
61
-
62
-
63
-
64
-
65
-
66
-
67
-
68
-
69
-
70
-
71
-
72
-
73
-
74
-
75
-
76
-
77
-
78
-
79
-
80
-
81
-
82
-
83
-
84
-
85
-
86
-
87
-
88
-
89
-
90
-
91
-
92
-
93
-
94
-
95
-
96
-
97
-
98
-
99
-
100
-
101
-
102
-
103
-
104
-
105
-
106
-
107
-
108
-
109
-
110
-
111
-
112
-
113
-
114
-
115
-
116
 |
 |

ASUS P4T User’s Manual
25
3. HARDWARE SETUP
1. Mount the
heatsink support braces
:
insert the four black
plastic
collars
from
the top through to the bottom of the
motherboard.
Insert the white plastic
plugs
into the middle of the black
plastic
collars
and pop them firmly out
the bottom of the motherboard.
Step 1: Mount the Heatsink Support Braces:
3.6.2
CPU Heatsink Retention Module Installation
Parts Inventory:
1.
Two
black plastic
heatsink support
braces
have built-in
retaining clips
.
2.
Four
black plastic
collars
and
four
white plastic
plugs
.
3. H/W SETUP
Heatsink