Asus P5Q Turbo User Guide - Page 107
Setting the RAID item in BIOS, Intel, Matrix Storage Manager option ROM utility
 |
UPC - 610839170258
View all Asus P5Q Turbo manuals
Add to My Manuals
Save this manual to your list of manuals |
Page 107 highlights
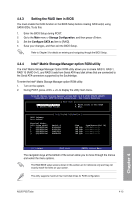
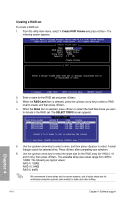
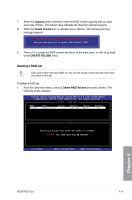
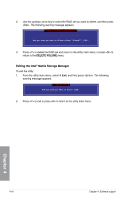
4.4.3 Setting the RAID item in BIOS You must enable the RAID function in the BIOS Setup before creating RAID set(s) using SATA HDDs. To do this: 1. Enter the BIOS Setup during POST. 2. Go to the Main menu > Storage Configuration, and then press . 3. Set the Configure SATA as item to [RAID]. 4. Save your changes, and then exit the BIOS Setup. Refer to Chapter 3 for details on entering and navigating through the BIOS Setup. 4.4.4 Intel® Matrix Storage Manager option ROM utility The Intel® Matrix Storage Manager Option ROM utility allows you to create RAID 0, RAID 1, RAID 10 (RAID 0+1), and RAID 5 sets from Serial ATA hard disk drives that are connected to the Serial ATA connectors supported by the Southbridge. To enter the Intel® Matrix Storage Manager option ROM utility: 1. Turn on the system. 2. During POST, press + to display the utility main menu. Intel(R) Matrix Storage Manager option ROM v8.0.0.1038 ICH10R wRAID5 Copyright(C) 2003-08 Intel Corporation. All Rights Reserved. [ MAIN MENU ] 1. Create RAID Volume 3. Reset Disks to Non-RAID 2. Delete RAID Volume 4. Exit RAID Volumes: None defined. [ DISK/VOLUME INFORMATION Physical Disks: Port Drive Model Serial Size Type/Status(Vol ID) 0 ST3160812AS 9LS0HJA4 149.0GB Non-RAID Disk 1 ST3160812AS 9LS0F4HL 149.0GB Non-RAID Disk 2 ST3160812AS 3LS0JYL8 149.0GB Non-RAID Disk 3 ST3160812AS 9LS0BJ5H 149.0GB Non-RAID Disk Chapter 4 Select [ESC]-Exit [ENTER]-Select Menu The navigation keys at the bottom of the screen allow you to move through the menus and select the menu options. The RAID BIOS setup screens shown in this section are for reference only and may not exactly match the items on your screen. The utility supports maximum four hard disk drives for RAID configuration. ASUS P5Q Turbo 4-13
-
 1
1 -
2
-
3
-
4
-
5
-
6
-
7
-
8
-
9
-
10
-
11
-
12
-
13
-
14
-
15
-
16
-
17
-
18
-
19
-
20
-
21
-
22
-
23
-
24
-
25
-
26
-
27
-
28
-
29
-
30
-
31
-
32
-
33
-
34
-
35
-
36
-
37
-
38
-
39
-
40
-
41
-
42
-
43
-
44
-
45
-
46
-
47
-
48
-
49
-
50
-
51
-
52
-
53
-
54
-
55
-
56
-
57
-
58
-
59
-
60
-
61
-
62
-
63
-
64
-
65
-
66
-
67
-
68
-
69
-
70
-
71
-
72
-
73
-
74
-
75
-
76
-
77
-
78
-
79
-
80
-
81
-
82
-
83
-
84
-
85
-
86
-
87
-
88
-
89
-
90
-
91
-
92
-
93
-
94
-
95
-
96
-
97
-
98
-
99
-
100
-
101
-
 102
102 -
 103
103 -
 104
104 -
 105
105 -
 106
106 -
 107
107 -
 108
108 -
 109
109 -
 110
110 -
 111
111 -
 112
112 -
113
-
114
 |
 |
