Asus S-presso Spresso Hardware User Manual - Page 30
DIMM installation
 |
View all Asus S-presso manuals
Add to My Manuals
Save this manual to your list of manuals |
Page 30 highlights
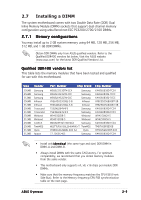
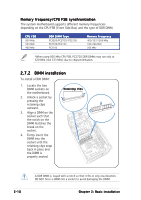
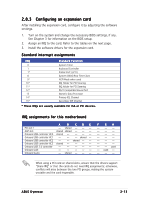
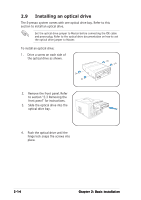
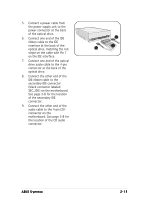
Memory frequency/CPU FSB synchronization The system motherboard supports different memory frequencies depending on the CPU FSB (Front Side Bus) and the type of DDR DIMM. CPU FSB 800 MHz 533 MHz 400 MHz DDR DIMM Type PC3200/PC2700*/PC2100 PC2700/PC2100 PC2100 Memory Frequency 400/333*/266 MHz 333/266 MHz 266 MHz *When using 800 MHz CPU FSB, PC2700 DDR DIMMs may run only at 320 MHz (not 333 MHz) due to chipset limitation. 2.7.2 DIMM installation To install a DDR DIMM: 1. Locate the two DIMM sockets on the motherboard. 2. Unlock a socket by pressing the retaining clips outward. 3. Align a DIMM on the socket such that the notch on the DIMM matches the break on the socket. 4. Firmly insert the DIMM into the socket until the retaining clips snap back in place and the DIMM is properly seated. Retaining clips 2-10 A DDR DIMM is keyed with a notch so that it fits in only one direction. DO NOT force a DIMM into a socket to avoid damaging the DIMM! Chapter 2: Basic installation
-
 1
1 -
2
-
3
-
4
-
5
-
6
-
7
-
8
-
9
-
10
-
11
-
12
-
13
-
14
-
15
-
16
-
17
-
18
-
19
-
20
-
21
-
22
-
23
-
24
-
 25
25 -
 26
26 -
 27
27 -
 28
28 -
 29
29 -
 30
30 -
 31
31 -
 32
32 -
 33
33 -
 34
34 -
 35
35 -
36
-
37
-
38
-
39
-
40
-
41
-
42
-
43
-
44
-
45
-
46
-
47
-
48
-
49
-
50
-
51
-
52
-
53
-
54
-
55
-
56
-
57
-
58
-
59
-
60
-
61
-
62
-
63
-
64
-
65
-
66
-
67
-
68
-
69
-
70
-
71
-
72
-
73
-
74
-
75
-
76
-
77
-
78
-
79
-
80
-
81
-
82
-
83
-
84
-
85
-
86
-
87
-
88
-
89
-
90
-
91
-
92
-
93
-
94
-
95
-
96
-
97
-
98
-
99
-
100
-
101
-
102
-
103
-
104
-
105
-
106
 |
 |
