Asus S-presso Spresso Hardware User Manual - Page 34
Installing an optical drive
 |
View all Asus S-presso manuals
Add to My Manuals
Save this manual to your list of manuals |
Page 34 highlights
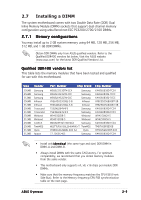
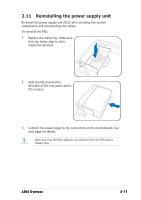
2.9 Installing an optical drive The S-presso system comes with one optical drive bay. Refer to this section to install an optical drive. Set the optical drive jumper to Master before connecting the IDE cable and power plug. Refer to the optical drive documentation on how to set the optical drive jumper to Master. To install an optical drive: 1. Drive a screw on each side of the optical drive as shown. 2. Remove the front panel. Refer to section "2.3 Removing the front panel" for instructions. 3. Slide the optical drive into the optical drive bay. 4. Push the optical drive until the hinge lock snaps the screws into place. 2-14 Chapter 2: Basic installation
-
 1
1 -
2
-
3
-
4
-
5
-
6
-
7
-
8
-
9
-
10
-
11
-
12
-
13
-
14
-
15
-
16
-
17
-
18
-
19
-
20
-
21
-
22
-
23
-
24
-
25
-
26
-
27
-
28
-
 29
29 -
 30
30 -
 31
31 -
 32
32 -
 33
33 -
 34
34 -
 35
35 -
 36
36 -
 37
37 -
 38
38 -
 39
39 -
40
-
41
-
42
-
43
-
44
-
45
-
46
-
47
-
48
-
49
-
50
-
51
-
52
-
53
-
54
-
55
-
56
-
57
-
58
-
59
-
60
-
61
-
62
-
63
-
64
-
65
-
66
-
67
-
68
-
69
-
70
-
71
-
72
-
73
-
74
-
75
-
76
-
77
-
78
-
79
-
80
-
81
-
82
-
83
-
84
-
85
-
86
-
87
-
88
-
89
-
90
-
91
-
92
-
93
-
94
-
95
-
96
-
97
-
98
-
99
-
100
-
101
-
102
-
103
-
104
-
105
-
106
 |
 |

2-14
2-14
2-14
2-14
2-14
Chapter 2: Basic installation
Chapter 2: Basic installation
Chapter 2: Basic installation
Chapter 2: Basic installation
Chapter 2: Basic installation
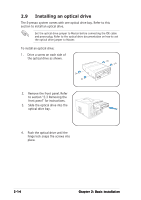
2.9
Installing an optical drive
The S-presso system comes with one optical drive bay. Refer to this
section to install an optical drive.
To install an optical drive:
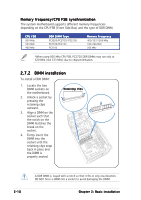
1.
Drive a screw on each side of
the optical drive as shown.
Set the optical drive jumper to Master before connecting the IDE cable
and power plug. Refer to the optical drive documentation on how to set
the optical drive jumper to Master.
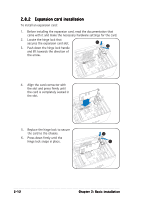
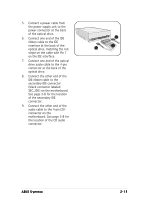
4.
Push the optical drive until the
hinge lock snaps the screws into
place.
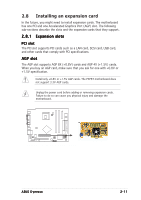
2.
Remove the front panel. Refer
to section “2.3 Removing the
front panel” for instructions.
3.
Slide the optical drive into the
optical drive bay.