Autodesk 15606-011408-9300 Developer Guide - Page 81
Print Event Handler Example, To add a custom symbol to the printout
 |
UPC - 606121429548
View all Autodesk 15606-011408-9300 manuals
Add to My Manuals
Save this manual to your list of manuals |
Page 81 highlights
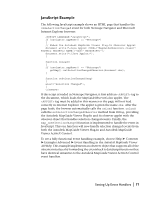
Print Event Handler Example If you want your application to change the title font, you can add a custom symbol, or control the position and size of any page element. To do this, you need to write event handling code that responds to the onEndLayout event. When onEndLayout is triggered, it automatically passes two objects, MGPrintLayout and MGPrintInfo objects: void onEndLayout (MGPrintLayout prLayout, MGPrintInfo info) The MGPrintLayout object provides access to printed page elements. You can then use MGPageElement and MGExtentEx to control how those elements display. The MGPrintInfo object provides information about the resolution of the output device and the size of the printable area of the page. The following example shows one way to write a print event handler in JavaScript that adds a custom symbol (myLogo)to the printout. The example assumes you've set up the event handlers as described in "Setting Up Event Handlers" on page 72, and enabled print events as described in "Enabling the Print Events" on page 66. To add a custom symbol to the printout 1 Create a button on the HTML page: 2 Create a JavaScript function that the button will call. In this example, the function sets the state of a boolean variable called new_symbol. The variable will be read by our event handler, so we've given it global scope by declaring it outside the function body: var new_symbol; // put var outside function body function print_map_only() { new_symbol = "true"; getMap().printDlg(); new_symbol = "false"; } Writing Event Handlers | 81
-
 1
1 -
2
-
3
-
4
-
5
-
6
-
7
-
8
-
9
-
10
-
11
-
12
-
13
-
14
-
15
-
16
-
17
-
18
-
19
-
20
-
21
-
22
-
23
-
24
-
25
-
26
-
27
-
28
-
29
-
30
-
31
-
32
-
33
-
34
-
35
-
36
-
37
-
38
-
39
-
40
-
41
-
42
-
43
-
44
-
45
-
46
-
47
-
48
-
49
-
50
-
51
-
52
-
53
-
54
-
55
-
56
-
57
-
58
-
59
-
60
-
61
-
62
-
63
-
64
-
65
-
66
-
67
-
68
-
69
-
70
-
71
-
72
-
73
-
74
-
75
-
 76
76 -
 77
77 -
 78
78 -
 79
79 -
 80
80 -
 81
81 -
 82
82 -
 83
83 -
 84
84 -
 85
85 -
 86
86 -
87
-
88
-
89
-
90
-
91
-
92
-
93
-
94
-
95
-
96
-
97
-
98
-
99
-
100
-
101
-
102
-
103
-
104
-
105
-
106
-
107
-
108
-
109
-
110
-
111
-
112
-
113
-
114
-
115
-
116
-
117
-
118
-
119
-
120
-
121
-
122
-
123
-
124
-
125
-
126
-
127
-
128
-
129
-
130
-
131
-
132
-
133
-
134
-
135
-
136
-
137
-
138
-
139
-
140
-
141
-
142
-
143
-
144
-
145
-
146
-
147
-
148
-
149
-
150
-
151
-
152
-
153
-
154
-
155
-
156
-
157
-
158
-
159
-
160
-
161
-
162
-
163
-
164
-
165
-
166
-
167
-
168
-
169
-
170
-
171
-
172
-
173
-
174
-
175
-
176
-
177
-
178
-
179
-
180
-
181
-
182
-
183
-
184
-
185
-
186
-
187
-
188
-
189
-
190
-
191
-
192
-
193
-
194
-
195
-
196
-
197
-
198
-
199
-
200
-
201
-
202
-
203
-
204
-
205
-
206
-
207
-
208
 |
 |
