44
ODYSSEY
Quick Start Guide
45
ODYSSEY Sequencer Operation
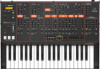
HOLD/REST
SHIFT
KYBD
PATTERN/BANK
REC
STEP
LOCATION LEDS
STEP SWITCHES 1 TO 8
RESET/ACCENT
PAGE
ARP/SET END
PLAY/STOP
OVERVIEW
The following details show some of the basic
operations of the sequencer. You can create a short
pattern of 2 or 3 steps, before trying more complex
patterns. Adjust a single parameter at a time, such as
gate length, ratchet, accent, portamento, rest, tie, or
swing, and then listen to its effect during playback.
It will help at first to choose a simple setting for
the synthesizer, such as only one source, and no
modulation of the VCO or VCF.
The length of the step notes can be adjusted using
the procedure shown later.
RECORDING A SIMPLE PATTERN
1.
Press SHIFT and <KYBD to select the
keyboard mode.
2.
Initialise the current pattern by pressing
SHIFT, RESET, and PATTERN at the same time.
This will delete any previous steps of the
current pattern.
3.
Press REC, and the STEP 1 switch LED will
begin flashing, indicating this is the current
step about to be added and edited. (If you
cannot select REC, then repeat step 1.)
4.
Press any note on the keyboard, or a rest as
shown below.
5.
To enter a rest instead of a note, press the
HOLD/REST switch. When a rest is added, the
LOCATOR LED 8 will light.
6.
Press further notes. The next STEP switch LED
will be flashing after each note or rest has
been added.
7.
The gate length of a step can be adjusted
using the TEMPO/GATE LENGTH control. The
LOCATOR LEDs will turn red, showing the gate
length from 1 to 8. If set to 8, this creates a tie
with the next step. If the next step is the same
note, this creates a longer note, as the 2 steps
are tied.
8.
To create a “Ratchet,” hold SHIFT, and adjust
the PORTAMENTO fader. The locator LEDs will
show the number of ratchets from 1 to 4, in
yellow. For example, with a setting of 4, the
single step is split into 4 equal parts. When a
ratchet is applied, the LOCATION LED 6
will light.
9.
To turn the portamento on for a step, turn up
the PORTAMENTO fader. To turn off, turn it all
the way down.
When portamento is on for a
step, the LOCATION LED 5 will light.
10.
To increase the brightness or accent, press
the RESET/ACCENT switch. When an accent is
applied, the LOCATION LED 7 will light.
11.
Press REC when you have finished creating
the pattern. It is not saved yet, but it can be
played back.
Caution:
Do not turn off the
unit, or create a new pattern, or the current
unsaved pattern will be lost.
PLAYING A PATTERN
1.
Press PLAY/STOP to listen to the
current pattern.
2.
If you decide not to save it, you can repeat the
recording steps above to record a new pattern.
Alternatively, press PATTERN and RESET to
recall the currently saved pattern, and discard
any changes.
3.
If you decide to save the pattern, you must
follow the “SAVING A PATTERN” procedure
shown below, or it will not remain in memory
if a new pattern is begun, or the power is
turned off.
4.
To create a SWING for this pattern, hold SHIFT
and adjust the TEMPO/GATE LENGTH fader.
In the center position, no swing is applied, if
turned down, only the off-beats will play, and
if all the way up, only the on-beats will play.
The SWING setting for the pattern is saved
when the pattern is saved as shown below.
5.
While playing a pattern:
Press HOLD/REST to hold the current step.
Press RESET/ACCENT to return to step 1.
Press SHIFT and any STEP, and you can edit the
gate length, rest, accent, ratchet, portamento,
but not note. Press SHIFT and the same STEP
again to exit step edit. (If playback is paused,
the same operation can edit the note as well.
Press PAGE to view the pattern page from 1 to
4. Press SHIFT and PAGE to return to automatic
page turning.
Press SHIFT and ARP/SETEND and a STEP to
change the sequence end step.
PLAY/STOP to pause playback.
6.
Press PLAY/STOP.
SAVING A PATTERN
1.
Press and hold SHIFT + PLAY/STOP for 2
seconds until the LOCATOR LED of the current
pattern number begins to flash green slowly.
2.
Press a STEP switch 1 to 8 to select the new
desired pattern number.
3.
Press PATTERN + STEP switch 1 to 8 to select
the desired bank number.
4.
Press SHIFT + REC to save the pattern and exit
the save mode.
RECALLING A SAVED PATTERN
1.
Press and hold PATTERN. The LOCATION LED
will show the current pattern number. Use the
<KYBD or STEP> switches to move up and
down through the patterns 1 to 8, or press a
STEP switch 1 to 8. You can also do this while a
pattern is playing.
2.
Press and hold SHIFT and PATTERN. The
LOCATION LED will show the current bank
number. Use the <KYBD or STEP> switches to
move up and down through the banks 1 to 8,
or press a STEP switch 1 to 8. You can also do
this while a pattern is playing.
3.
Press PLAY/STOP to play back the
current pattern.
4.
During playback, the LOCATION LEDs will
show the current page of the pattern (1 to 4),
and the STEP Switch LEDs will show the
steps moving.
LIVE PERFORMANCE
During playback, temporary adjustments can be
made as follows. (None of these are saved with
the pattern.)
1.
To add Ratchet to all steps of the
pattern, press SHIFT and adjust the
PORTAMENTO fader.
2.
To add SWING, press SHIFT and adjust the
TEMPO fader.
3.
To mute the pattern, press SHIFT +
HOLD/REST.
4.
To add an accent to all steps, press SHIFT +
RESET/ACCENT.
5.
Use the TRANSPOSE switch to change
the octave.
EDITING A PATTERN
1.
To edit a pattern in Keyboard mode, press REC.
The STEP switch LEDs will light.
2.
Press PAGE to select the pattern page from 1
to 4 to be edited. The green LOCATION LEDs 1
to 4 will show the current page.
3.
Press SHIFT and the STEP switch you want to
edit. You can enter a new note, or a rest, and
adjust any of the other parameters such as
ratchet, portamento and so on.
4.
Press SHIFT and the next STEP switch to be
edited. (The steps will not automatically
advance to the next step in line; you can
choose which steps to edit next.)
5.
Press REC to exit the editing mode.
6.
Press PLAY/STOP to listen to the
edited pattern.
7.
Remember to save the pattern using the
“SAVING A PATTERN” procedure above.
CREATING A PATTERN IN STEP MODE
1.
Press SHIFT and STEP> to select the
Sequencer’s STEP mode. The flashing
LOCATION LED will turn from green
(Keyboard mode) to yellow (Step mode).
2.
Initialise the current pattern by pressing
SHIFT, RESET, and PATTERN at the same
time. This will delete any previous steps
of the current pattern. (If you want to use
the current pattern instead, then do not
initialise it.)
3.
Press PAGE to move to a desired page of
your pattern. Then press SET END and a STEP
switch to choose the length of the pattern.
For example, if you are on page 1 and press
SET END + 8, then the pattern length is
8 steps. If you press PAGE and reach page 4,
and press SET END + 8, then the pattern will
be 32 steps long (4 pages of 8 steps each).
4.
When the desired SET END is selected, all the
STEP switch LEDs up to that step will be on
solid red.
5.
Press SHIFT and any one of the STEP switches
at the same time. It will begin to flash,
indicating it is the current step about to be
edited. You can now add a note, or a rest, or
any of the other functions described above
in the Keyboard mode, such as ratchet,
portamento, accent, change gate length and
so on.
6.
Press SHIFT and the current STEP switch to
finish editing that step. It will stop flashing.
7.
Repeat procedure steps 5 and 6 above, until all
your required steps are good.
8.
Press PLAY/STOP to play the pattern.
9.
While playing, you can add temporary
adjustments as shown in the “LIVE
PERFORMANCE” procedure above.
SAVING A PATTERN IN STEP MODE
1.
Save the pattern using the “SAVING A
PATTERN” procedure shown above for the
KEYBOARD mode.
 1
1 18
18 19
19 20
20 21
21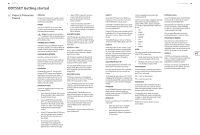 22
22 23
23 24
24 25
25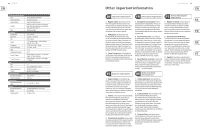 26
26 27
27 28
28

