Beko HII64430GT User Manual - Page 20
Beko HII64430GT Manual
 |
View all Beko HII64430GT manuals
Add to My Manuals
Save this manual to your list of manuals |
Page 20 highlights
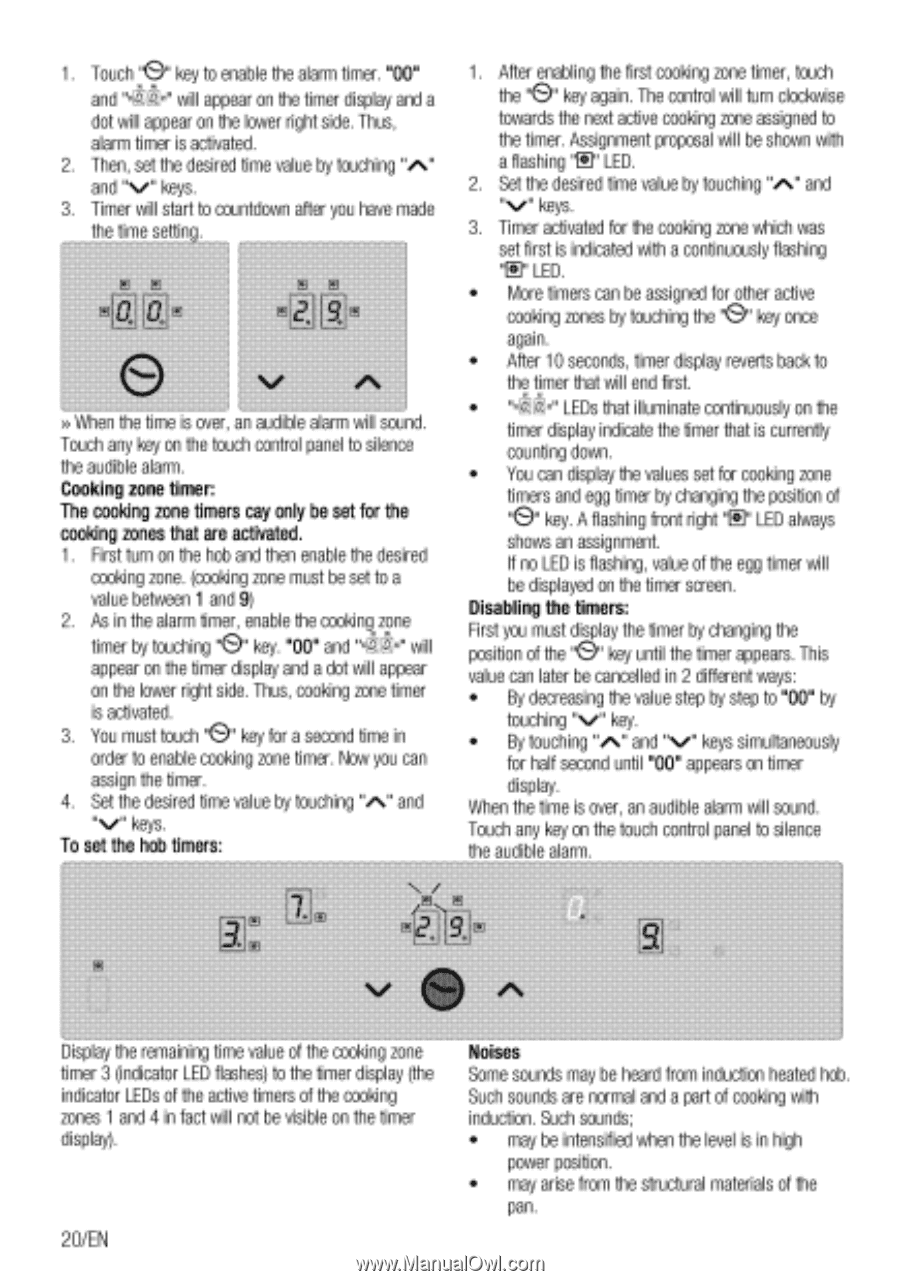
1. Touch "e" key to enable the alarm timer. "00" and "- •" will appear on the timer display and a dot will appear on the lower right side. Thus, alarm timer is activated. Then, set the desired time value by touching "^" and "\e" keys. Timer will start to countdown after you have made the time setting. T Ns' >> When the time is over, an audible alarm will sound. Touch any key on the touch control panel to silence the audible alarm. Cooking zone timer: The cooking zone timers cay only be set for the cooking zones that are activated. 1. First turn on the hob and then enable the desired cooking zone. (cooking zone must be set to a value between 1 and 9) 2. As in the alarm timer, enable the cooking zone timer by touching "0" key. "00" and will appear on the timer display and a dot will appear on the lower right side. Thus, cooking zone timer is activated. 3. You must touch "0" key for a second time in order to enable cooking zone timer. Now you can assign the timer. 4. Set the desired time value by touching ","." and "u" keys. To set the hob timers: 1. After enabling the first cooking zone timer, touch the "0" key again. The control will turn clockwise towards the next active cooking zone assigned to the timer. Assignment proposal will be shown with a flashing "Er LED. 2. Set the desired time value by touching "."" and "N.e" keys. 3. Timer activated for the cooking zone which was set first is indicated with a continuously flashing "Er LED. • More timers can be assigned for other active cooking zones by touching the "0" key once again. • After 10 seconds, timer display reverts back to the timer that will end first. • "•c " LEDs that illuminate continuously on the timer display indicate the timer that is currently counting down. • You can display the values set for cooking zone "9"timers and egg timer by changing the position of key. A flashing front right "0" LED always shows an assignment. If no LED is flashing, value of the egg timer will be displayed on the timer screen. Disabling the timers: First you must display the timer by changing the position of the "0" key until the timer appears. This value can later be cancelled in 2 different ways: • By decreasing the value step by step to "00" by touching "*...," key. • By touching "."" and "\e" keys simultaneously for half second until "00" appears on timer display. When the time is over, an audible alarm will sound. Touch any key on the touch control panel to silence the audible alarm. Display the remaining time value of the cooking zone timer 3 (indicator LED flashes) to the timer display (the indicator LEDs of the active timers of the cooking zones 1 and 4 in fact will not be visible on the timer display). 20/EN Noises Some sounds may be heard from induction heated hob. Such sounds are normal and a part of cooking with induction. Such sounds; • may be intensified when the level is in high power position. • may arise from the structural materials of the pan.
-
 1
1 -
2
-
3
-
4
-
5
-
6
-
7
-
8
-
9
-
10
-
11
-
12
-
13
-
14
-
 15
15 -
 16
16 -
 17
17 -
 18
18 -
 19
19 -
 20
20 -
 21
21 -
 22
22 -
 23
23 -
 24
24 -
 25
25 -
26
-
27
-
28
 |
 |