Belkin F5D7230-4_V4000 User Guide - Page 86
Setting or Changing the Administrator Password, Changing the Login Time-Out Setting, Setting
 |
View all Belkin F5D7230-4_V4000 manuals
Add to My Manuals
Save this manual to your list of manuals |
Page 86 highlights
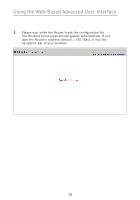
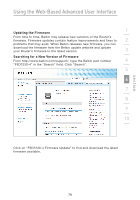
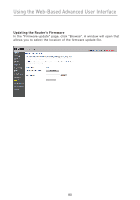
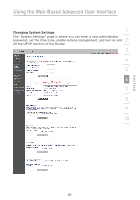
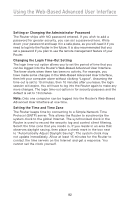
Using the Web-Based Advanced User Interface Setting or Changing the Administrator Password The Router ships with NO password entered. If you wish to add a password for greater security, you can set a password here. Write down your password and keep it in a safe place, as you will need it if you need to log into the Router in the future. It is also recommended that you set a password if you plan to use the remote management feature of your Router. Changing the Login Time-Out Setting The login time-out option allows you to set the period of time that you can be logged into the Router's Web-Based Advanced User Interface. The timer starts when there has been no activity. For example, you have made some changes in the Web-Based Advanced User Interface, then left your computer alone without clicking "Logout". Assuming the time-out is set to 10 minutes, then 10 minutes after you leave, the login session will expire. You will have to log into the Router again to make any more changes. The login time-out option is for security purposes and the default is set to 10 minutes. Note: Only one computer can be logged into the Router's Web-Based Advanced User Interface at one time. Setting the Time and Time Zone The Router keeps time by connecting to a Simple Network Time Protocol (SNTP) server. This allows the Router to synchronize the system clock to the global Internet. The synchronized clock in the Router is used to record the security log and control client filtering. Select the time zone that you reside in. If you reside in an area that observes daylight saving, then place a check mark in the box next to "Automatically Adjust Daylight Saving". The system clock may not update immediately. Allow at least 15 minutes for the Router to contact the time servers on the Internet and get a response. You cannot set the clock yourself. 82
-
 1
1 -
2
-
3
-
4
-
5
-
6
-
7
-
8
-
9
-
10
-
11
-
12
-
13
-
14
-
15
-
16
-
17
-
18
-
19
-
20
-
21
-
22
-
23
-
24
-
25
-
26
-
27
-
28
-
29
-
30
-
31
-
32
-
33
-
34
-
35
-
36
-
37
-
38
-
39
-
40
-
41
-
42
-
43
-
44
-
45
-
46
-
47
-
48
-
49
-
50
-
51
-
52
-
53
-
54
-
55
-
56
-
57
-
58
-
59
-
60
-
61
-
62
-
63
-
64
-
65
-
66
-
67
-
68
-
69
-
70
-
71
-
72
-
73
-
74
-
75
-
76
-
77
-
78
-
79
-
80
-
 81
81 -
 82
82 -
 83
83 -
 84
84 -
 85
85 -
 86
86 -
 87
87 -
 88
88 -
 89
89 -
 90
90 -
 91
91 -
92
-
93
-
94
-
95
-
96
-
97
-
98
-
99
-
100
-
101
-
102
-
103
-
104
-
105
-
106
-
107
-
108
-
109
-
110
-
111
-
112
-
113
-
114
-
115
-
116
-
117
-
118
-
119
-
120
 |
 |