BenQ Joybee GP1 GP1 User Manual
BenQ Joybee GP1 Manual
 |
View all BenQ Joybee GP1 manuals
Add to My Manuals
Save this manual to your list of manuals |
BenQ Joybee GP1 manual content summary:
- BenQ Joybee GP1 | GP1 User Manual - Page 1
Joybee GP1 Mini Projector User Manual Welcome - BenQ Joybee GP1 | GP1 User Manual - Page 2
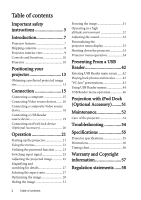
42 "PC-less" presentations 43 Using USB Reader menus 44 USB Reader menu operation 46 Projection with iPod Dock (Optional Accessory)........51 Maintenance 52 Care of the projector 52 Troubleshooting 54 Specifications 55 Projector specifications 55 Dimensions 56 Timing chart 56 Warranty - BenQ Joybee GP1 | GP1 User Manual - Page 3
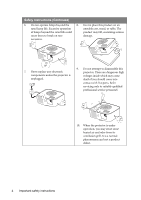
that you connect your projector through a power stabilizer, surge protector or uninterruptible power supply (UPS). 2. Do not look straight at the projector lens during operation. The intense light beam may damage your eyes. 3. Refer servicing to qualified service personnel. 5. Do not block - BenQ Joybee GP1 | GP1 User Manual - Page 4
rare damage. occasions. 7. Never replace any electronic components unless the projector is unplugged. 9. Do not attempt to disassemble this projector. There are dangerous high voltages inside which may cause death if you should come into contact with live parts. Refer servicing only to suitably - BenQ Joybee GP1 | GP1 User Manual - Page 5
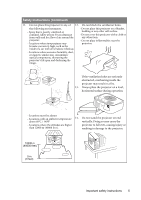
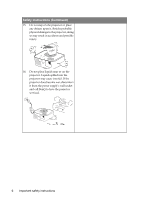
the projector on end above 60°C / 140°F vertically. Doing so may cause the - Locations where the altitudes are higher projector to fall over, causing injury or than 12000 m (40000 feet). resulting in damage to the projector. 12000 m (40000 feet) 0 m (0 feet) Important safety instructions 5 - BenQ Joybee GP1 | GP1 User Manual - Page 6
accidents and possible injury. 16. Do not place liquids near or on the projector. Liquids spilled into the projector may cause it to fail. If the projector does become wet, disconnect it from the power supply's wall socket and call BenQ to have the projector serviced. 6 Important safety instructions - BenQ Joybee GP1 | GP1 User Manual - Page 7
projector offers the following features. • USB reader making photo and movie colors • Multi-language On input signal contrast/brightness settings, and is directly proportional to projection distance. • The lamp brightness will decline over time and may vary within the lamp manufacturers specifications - BenQ Joybee GP1 | GP1 User Manual - Page 8
may differ from those illustrated. *The warranty card is only supplied in some specific regions. Please consult your dealer for detailed information. Projector Power cord Multi-input cable AC adapter Safety manual Quick start guide User manual CD Warranty card* Pull the tab before using the - BenQ Joybee GP1 | GP1 User Manual - Page 9
panel (See "Projector" on page 10 for details.) 2. Vent (heated air exhaust) 3. Front IR remote sensor 4. Focus ring 4 5. Projection lens 5 Rear/lower side 6 7 9 6. Multi-input socket -RGB (PC)/Component video (YPbPr/ YCbCr) /Composite video/ Audio input (L/R) 7. USB Reader slot 8. Audio - BenQ Joybee GP1 | GP1 User Manual - Page 10
back to USB Reader main menu. Goes back to previous OSD menu. Press for three seconds to display Projector Menu 7 Keystone/Arrow keys Acts as previous file selection ( / ) or next file selection ( / ). 8 MODE/ ENTER Enacts the selected menu item. Plays back and pauses the photo and movie. 10 - BenQ Joybee GP1 | GP1 User Manual - Page 11
menu item. See "Using the menus" PROJECTOR on page 22 for details. 2. FREEZE USB READER Freezes the projected image. See "Freezing 10. SELECT/ the image" on page 31 for details. Plays back and pauses the photo and 3. AUTO movie. Enacts the selected USB On- Automatically determines the best - BenQ Joybee GP1 | GP1 User Manual - Page 12
are no obstacles between the remote control and the IR sensor on the projector that might obstruct the infra-red beam. Replacing the remote control battery 1. Pull out the battery holder. Please follow the illustrated instructions. Push and hold the locking arm while pulling out the battery holder - BenQ Joybee GP1 | GP1 User Manual - Page 13
projector lens to the screen, the zoom setting (if available), and the video format each factors in the projected image size. 4:3 is the native aspect ratio of this projector BenQ has provided a table of 4:3-aspect-ratio screen sizes to assist you in determining the ideal location for your projector. - BenQ Joybee GP1 | GP1 User Manual - Page 14
There is 3% tolerance among these numbers due to optical component variations. BenQ recommends that if you intend to permanently install the projector, you should physically test the projection size and distance using the actual projector in situ before you permanently install it, so as to make - BenQ Joybee GP1 | GP1 User Manual - Page 15
adapter is needed if you are connecting legacy version Macintosh computers. To connect the projector to a notebook or desktop computer: 1. Take the supplied multi-input cable computer Multi-input cable Audio cable Many notebooks do not turn on their external video ports when connected to a projector. - BenQ Joybee GP1 | GP1 User Manual - Page 16
be your connection method of choice in preference to (composite) Video. See "Connecting a Component Video source device" on page 17 for how to connect the projector to a component video device. Least video quality Composite Video is an analog video and will result in a perfectly acceptable, but less - BenQ Joybee GP1 | GP1 User Manual - Page 17
other end of the Component Video to VGA (D-Sub) adaptor cable (with a D-Sub type connector) to the multi-input cable. 3. Connect the multi-input cable to the multi-input socket on the projector. 4. If you wish to make use of the projector speaker, take a suitable audio cable and connect one end of - BenQ Joybee GP1 | GP1 User Manual - Page 18
, and the other end to the audio input sockets of the multi-input cable. The final connection path should be like that shown in the following diagram: AV device Multi-input cable Video cable Audio cable • If the selected video image is not displayed after the projector is turned on and the correct - BenQ Joybee GP1 | GP1 User Manual - Page 19
or portable 2.5" hard disk drive. To connect the projector to a USB Reader source device: 1. Connect a USB Reader source device to the USB slot on the projector. 2. If you wish to make use of a speaker or other audio input equipment, take a suitable audio cable and connect one end to the audio - BenQ Joybee GP1 | GP1 User Manual - Page 20
to an iPod Dock source device 1. Dock your iPod to fit the iPod connector. 2. Connect the iPod Dock cable into the multi-input socket on the projector. The final connection path should be like that shown in the following diagram: iPod Dock device • See "Projection with iPod Dock (Optional Accessory - BenQ Joybee GP1 | GP1 User Manual - Page 21
1. Plug the AC adapter into the DC IN socket of the projector. 2. Plug one end of the power cord into the AC adapter. 3. Plug the other end of the power cord into a wall socket. Turn on the wall socket switch (where fitted). Check that the Power LED indicator on the projector flashes blue slowly and - BenQ Joybee GP1 | GP1 User Manual - Page 22
menu. Main menu icon Main menu Highlight Sub-menu Current input signal Status Press MENU/ EXIT to the previous page or to exit. To use the OSD menus, please set them to your familiar language first. 1. Press MENU/EXIT on the projector or 3. Highlight Language and press remote control to turn - BenQ Joybee GP1 | GP1 User Manual - Page 23
you activate the power-on lock functionality and subsequently forget the password. Print out this manual (if necessary) and write the password you used in this manual, and keep the manual in a safe place for later recall. Setting a password Once a password has been set, the projector cannot be used - BenQ Joybee GP1 | GP1 User Manual - Page 24
projector will display a coded number on the screen. 2. Write down the number and turn off your projector. 3. Seek help from the local BenQ service password. The digits being input will display as asterisks on-screen. Write your selected password down here in this manual in advance or right after - BenQ Joybee GP1 | GP1 User Manual - Page 25
static images are generally brighter than "Video" using mostly moving images (movies). • The input signal type effects the options available for the Picture Mode. See "Selecting a picture mode" on page 28 for details. • The native display resolution of this projector is in a 4:3 aspect ratio. For - BenQ Joybee GP1 | GP1 User Manual - Page 26
image is noticeably wider at either the top or bottom. It occurs when the projector is not perpendicular to the screen. To correct this, besides adjusting the height of the projector, you will need to manually correct it following one of these steps. • Using the remote control Press / on the - BenQ Joybee GP1 | GP1 User Manual - Page 27
format of the video signal and your display requirements. About the aspect ratio In the pictures below, the black portions are inactive areas and the white portions are active areas. OSD menus can be displayed on those unused black areas. 1. Auto: Scales an image proportionally to fit the projector - BenQ Joybee GP1 | GP1 User Manual - Page 28
, and resized to fit within the display area. For input signals with lower resolutions, the projected image will display smaller than if resized 4:3 picture to full screen. You could adjust the zoom setting or move the projector towards the screen to increase the image size if necessary - BenQ Joybee GP1 | GP1 User Manual - Page 29
calibrated camera, and for viewing PC graphic and drawing applications such as AutoCAD. 4. Movie mode: Is appropriate for playing colorful movies, video clips from digital cameras or DVs through the PC input for best viewing in a blackened (little light) environment. 5. User mode: Recalls the - BenQ Joybee GP1 | GP1 User Manual - Page 30
you have previously adjusted the Brightness setting to suit your selected input and viewing environment. +30 0 -30 Adjusting Color Highlight Color in the PICTURE menu and adjust the values by pressing / on the projector or remote control. Lower setting produces less saturated colors. If the - BenQ Joybee GP1 | GP1 User Manual - Page 31
action taken on the blank screen. Once BLANK is pressed, the projector enters Economic mode automatically. Do not block the projection lens from projecting any key on the projector or remote control. Even if an image is frozen on the screen, the pictures are running on the video or other device. If - BenQ Joybee GP1 | GP1 User Manual - Page 32
the sound The sound adjustments made as below will have an effect on the projector speaker(s). Be sure you have made a correct connection to the projector audio input. See "Connection" on page 15 for how the audio input is connected. Muting the sound To temporarily turn off the sound: 1. Press MENU - BenQ Joybee GP1 | GP1 User Manual - Page 33
run for approximately 90 seconds to cool down the projector. 3. Once the cooling process finishes, the Power LED indicator flashes blue slowly and Ring LED indicator lights blue and fans stop. 4. Disconnect the power cord from the wall socket if the projector will not be used in an extended period - BenQ Joybee GP1 | GP1 User Manual - Page 34
Projector Position Menu display time Menu Settings Menu position Security Settings Information Reset All Settings Menu Type Change password Change Security Settings • Power on Lock FAQ-Image and Installation FAQ-Features and Service Current System Status • Source • Picture Mode • Resolution - BenQ Joybee GP1 | GP1 User Manual - Page 35
Projector Position Auto Power Off Blank Timer Sleep Timer Splash Screen Options Off/Light Yellow/Pink/Light Green/Blue/Blackboard Full Screen/4:3/16:9/Auto/Real On/Off Brightest/PC/Movie/Photo/ User Brightest/PC/Movie min Disable/30 min/1 hr/2 hr/3 hr/4 hr/8 hr/12 hr BenQ/Black/Blue Operation 35 - BenQ Joybee GP1 | GP1 User Manual - Page 36
Settings • Power on Lock On/Off Reset All Settings FAQ-Image and Installation FAQ-Features and Service 6. Current System Status • Source INFORMATI • Picture Mode ON • Resolution • Color System • System Hour • FW Version Note that the menu items are available when the projector detects - BenQ Joybee GP1 | GP1 User Manual - Page 37
is not white. See "Using Wall Color" on page 30 for details. There are four options to set the image's aspect ratio depending on your input signal source. See "Selecting the aspect ratio" on page 27 for details. Auto corrects any keystoning of the image. Corrects any keystoning of the image - BenQ Joybee GP1 | GP1 User Manual - Page 38
Brightest) Pre-defined picture modes are provided so you can optimize your projector image set-up to suit your program type. See "Selecting a "Adjusting Tint" on page 30 for details. The function is only available when Video with NTSC system is selected. Adjusts the image to make it look sharper or - BenQ Joybee GP1 | GP1 User Manual - Page 39
Quick Auto Search (On) Test Pattern (Off) Language (English) Projector Position (Front Table) Auto Power Off (Disable) Blank Timer (Disable) Sleep Timer (Disable) Splash Screen (BenQ logo) DESCRIPTION (default setting/value) See "Switching input signal" on page 25 for details. Selecting On enables - BenQ Joybee GP1 | GP1 User Manual - Page 40
Display (OSD) menu position. Change password You will be asked to enter the current password before changing to a new one. Change Security Settings Power on Lock (Off) See "Utilizing the password function" on page 23 for details. Returns all settings to the factory preset values. The following - BenQ Joybee GP1 | GP1 User Manual - Page 41
and Service Displays possible solutions to problems you may encounter. Source Shows the current signal source. Picture Mode Shows the selected mode in the PICTURE menu. Current System Status Resolution Shows the native resolution of the input signal. Color System Shows input system format, NTSC - BenQ Joybee GP1 | GP1 User Manual - Page 42
and movies. Entering USB Reader main screen 1. Connect your USB Reader into the projector. 2. Turn on the projector, if it is not already on. The projector will automatically search for USB Reader signal if the Quick Auto Search function in the SOURCE menu is On. You may also manually select USB - BenQ Joybee GP1 | GP1 User Manual - Page 43
present sheets and graphics. 1. Open your PowerPoint file. 2. Click "File" and select "Save As". 3. Save the file in your USB Reader, select "*.jpg" as file type and then click "Save". 4. Insert your USB Reader into the USB Reader slot on the projector. 5. Execute "PC-less" presentations from your - BenQ Joybee GP1 | GP1 User Manual - Page 44
screen is equipped with On-Screen Display (OSD) menus for making various adjustments and settings. Below is the overview of the Photo Setting menu. In USB Reader mode, be sure to use keys included in USB READER on the remote control for function control and menu adjustments. 44 Presenting From - BenQ Joybee GP1 | GP1 User Manual - Page 45
To use USB Reader OSD menus, please set them to your familiar language first. 1. Press SETTING. • You can also highlight Settings and press SELECT/ to * to leave and save the settings. • You can also directly press SETTING in step 6 to leave and save the settings. Presenting From a USB Reader 45 - BenQ Joybee GP1 | GP1 User Manual - Page 46
Reader menu operation USB Reader menu system Please note that the on-screen display (OSD) menus vary according to the signal type selected. Main menu Sub-menu Interval Time 1. Photo Setting 2. Auto Play Transition Effect Show Type Slide Mode Photo Movie Volume On/Off On/Off 0 - 10 Options - BenQ Joybee GP1 | GP1 User Manual - Page 47
(Off) Sets to whether to initiate the automatic play function after entering "Movie" mode. If this setting is set to "On", the system will automatically play the video after entering "Movie"; if it is set to "Off ", then the system will enter File Manager mode. Presenting From a USB Reader 47 - BenQ Joybee GP1 | GP1 User Manual - Page 48
On-Screen Display (OSD) menus. 3. Custom Setup menu Subtitle Language Repeat Mode Default 4. Exit See "Using USB Reader menus" on page 44 for details. * The language options vary depending on regions. Sets the character encoding of the languages. Sets the play repeat - BenQ Joybee GP1 | GP1 User Manual - Page 49
USB Reader support format Photo Extension Detail .jpeg .bmp .gif .tiff Baseline JPEG WxH = 14592x12288, Up to 179 Mega-pixel Support format: 444/ 440/ 422/ 420/ Grayscale max. file size = 40MB Progressive JPEG Up to 4 Mega-pixel Support format: 444/ 440/ 422/ 420/ Grayscale max. file size = 40MB - BenQ Joybee GP1 | GP1 User Manual - Page 50
Extension .dat/ .mpg Video Codec MPEG-1/ 2 Audio Codec MPEG layer 1/ 2 .vob MPEG-1/ 2 AC3 .avi Movie XviD/ 3ivX MS ISO MPEG4 MPEG layer 1/ 2 uLaw : max. 720x576 @ 25 fps Baseline JPEG :VGA @ 30fps Format SMI SRT SUB Subtitle ASS SSA PSB Note Text File Format 50 Presenting From a USB Reader - BenQ Joybee GP1 | GP1 User Manual - Page 51
iPod Dock. Multimedia base features iPod Dock, which brings your music, videos and photos together. 1. Dock your iPod to fit the iPod connector. 2. Connect the iPod Dock cable into the multi-input socket on the projector. 3. Turn on your iPod and projector. 4. Select your music, videos and photos - BenQ Joybee GP1 | GP1 User Manual - Page 52
clean. Never remove any parts of the projector except the lamp. Contact your dealer if other parts need replacing. Cleaning the lens instructions below: • Make sure the temperature and humidity of the storage area are within the recommended range for the projector. Please refer to "Specifications - BenQ Joybee GP1 | GP1 User Manual - Page 53
Indicators Status / Problems Standby Power on Cooling Fan1 error Fan2 error Temperature error LED indicators Ring Power Key Blue Blue Blue Blue slow flash Blue slow flash Blue slow flash Blue slow flash Off Blue On Blue fast flash Off Red fast - BenQ Joybee GP1 | GP1 User Manual - Page 54
Troubleshooting The projector does not turn on. Cause There is no power from the power cable. Attempting to turn the projector on again during the cooling process. No picture Cause The video source is not turned on or connected correctly. The projector is not correctly connected to the input signal - BenQ Joybee GP1 | GP1 User Manual - Page 55
Specifications Projector specifications All specifications are subject to change without notice. General Product name Model name Digital Projector GP1 Optical Resolution Display system Lens F/Number Lamp 858 x 600 SVGA 1-CHIP DMD F = 2, f = 17.67 mm LED Electrical Power supply Power - BenQ Joybee GP1 | GP1 User Manual - Page 56
x 120 mm (D) 136 120 57 Timing chart 35.3 28.4 Supported timing for PC input Mode Resolution 640 x 480 VGA 720 x 400 SVGA 800 x 600 XGA 63.80 67.50 49.70 60.00 63.98 Supported timing for Component-YPbPr/Video input Video mode 480i 480p 576i 576p 720p 720p 1080i 1080i Horizontal - BenQ Joybee GP1 | GP1 User Manual - Page 57
replacement of any defective parts (labor included). To obtain warranty service, immediately notify the dealer from which you purchased the product of any defects. Important: The above warranty shall be void if the customer fails to operate the product in accordance with BenQ's written instructions - BenQ Joybee GP1 | GP1 User Manual - Page 58
energy and, if not installed and used in accordance with the instructions, may cause harmful interference to radio communications. However, there is shop where you purchased the equipment or your household waste disposal service. The recycling of materials will help to conserve natural resources and - BenQ Joybee GP1 | GP1 User Manual - Page 59
computer systems correctly. • Some models of BenQ's monitors and projectors contain additional USB and DVI ports for connection to more devices such as a special headphone to assist the hearing impaired. • All BenQ monitors and projectors come with user manuals on compact discs which could be easily
-
 1
1 -
 2
2 -
 3
3 -
 4
4 -
 5
5 -
 6
6 -
 7
7 -
8
-
9
-
10
-
11
-
12
-
13
-
14
-
15
-
16
-
17
-
18
-
19
-
20
-
21
-
22
-
23
-
24
-
25
-
26
-
27
-
28
-
29
-
30
-
31
-
32
-
33
-
34
-
35
-
36
-
37
-
38
-
39
-
40
-
41
-
42
-
43
-
44
-
45
-
46
-
47
-
48
-
49
-
50
-
51
-
52
-
53
-
54
-
55
-
56
-
57
-
58
-
59
 |
 |

Welcome
Joybee GP1 Mini Projector
User Manual