BenQ Joybee GP1 GP1 User Manual - Page 19
Connecting a USB Reader source device - support
 |
View all BenQ Joybee GP1 manuals
Add to My Manuals
Save this manual to your list of manuals |
Page 19 highlights
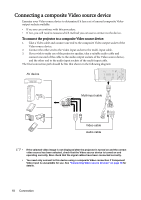
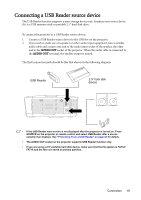
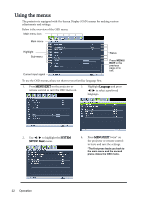
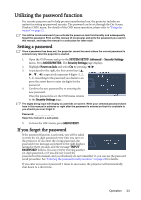
Connecting a USB Reader source device The USB Reader function supports a mass storage device only. Examine your source device if it is a USB memory stick or portable 2.5" hard disk drive. To connect the projector to a USB Reader source device: 1. Connect a USB Reader source device to the USB slot on the projector. 2. If you wish to make use of a speaker or other audio input equipment, take a suitable audio cable and connect one end to the audio input socket of the speaker, the other end to the AUDIO OUT socket of the projector. When the audio cable is connected to the AUDIO OUT terminal, the speaker output is muted. The final connection path should be like that shown in the following diagram: USB Reader PORTABLE 2.5" HARD DISK DRIVE 2.5" hark disk device • If the USB Reader main screen is not displayed after the projector is turned on. Press SOURCE on the projector or remote control and select USB Reader after a source selection bar displays. See "Presenting From a USB Reader" on page 42 for details. • The AUDIO OUT socket on the projector supports USB Reader function only. • If you are using a 2.5" portable hard disk device, make sure that the file system is FAT32/ FAT16 and the files are saved in primary partition. Connection 19
-
 1
1 -
2
-
3
-
4
-
5
-
6
-
7
-
8
-
9
-
10
-
11
-
12
-
13
-
 14
14 -
 15
15 -
 16
16 -
 17
17 -
 18
18 -
 19
19 -
 20
20 -
 21
21 -
 22
22 -
 23
23 -
 24
24 -
25
-
26
-
27
-
28
-
29
-
30
-
31
-
32
-
33
-
34
-
35
-
36
-
37
-
38
-
39
-
40
-
41
-
42
-
43
-
44
-
45
-
46
-
47
-
48
-
49
-
50
-
51
-
52
-
53
-
54
-
55
-
56
-
57
-
58
-
59
 |
 |
