Bosch MUM6N11UC Use & Care Manual - Page 21
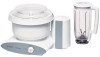
Placing, Blender into, Operation, Removing, Contents
 |
View all Bosch MUM6N11UC manuals
Add to My Manuals
Save this manual to your list of manuals |
Page 21 highlights
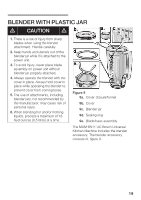
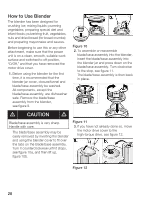
4. Place the blender with cover on the highĆspeed drive of the power unit. Note the mark on the appliance and on the blender. Turn the blender counterclockwise with a slight downward pressure until the jar is firmly seated, see figure 13. Any subsequent additions to the blended material should be made through the cover opening, see figure 14. For solids and/or granular material, remove the cover closure/funnel to add the material, as shown in figure 14a. For liquids, the closure/funnel may be left in place and the liquids added by pouring it into the closure/funnel, see figure 14b. Figure 13 Placing Blender into Operation Normally when blending, the blender jar should be filled with the entire amount of material to be blended, if possible, before switching the appliance on. The cover and cover closure should always be in place after filling the blender jar and before switching the power unit to On. Figure 14 Removing Contents Before beginning to remove the contents from the blender, make sure that the power unit has been turned to the Off position, O/Off". Remove the blender from the power unit by turning the blender clockwise while lifting. With the blender removed from the power unit, the contents of the blender may now be poured into a suitable container or bowl, as desired. 21
-
 1
1 -
2
-
3
-
4
-
5
-
6
-
7
-
8
-
9
-
10
-
11
-
12
-
13
-
14
-
15
-
 16
16 -
 17
17 -
 18
18 -
 19
19 -
 20
20 -
 21
21 -
 22
22 -
 23
23 -
 24
24 -
 25
25 -
 26
26 -
27
-
28
-
29
-
30
-
31
-
32
-
33
-
34
-
35
-
36
-
37
-
38
-
39
-
40
-
41
-
42
-
43
-
44
-
45
-
46
-
47
-
48
-
49
-
50
-
51
-
52
-
53
-
54
-
55
-
56
-
57
-
58
-
59
-
60
-
61
-
62
-
63
-
64
-
65
-
66
-
67
-
68
-
69
-
70
-
71
-
72
-
73
-
74
-
75
-
76
-
77
-
78
-
79
-
80
-
81
-
82
-
83
-
84
 |
 |
