Brother International ADS-3100 Brother ScanEssentials Users Guide - Page 7
Scan Using the Basic Scan Button
 |
View all Brother International ADS-3100 manuals
Add to My Manuals
Save this manual to your list of manuals |
Page 7 highlights
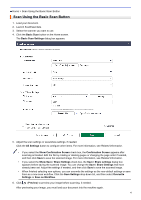
Home > Scan Using the Basic Scan Button Scan Using the Basic Scan Button 1. Load your document. 2. Launch ScanEssentials. 3. Select the scanner you want to use. 4. Click the Basic Scan button on the Home screen. The Basic Scan Settings dialog box appears. 5. Adjust the scan settings or save/share settings, if needed. Click the All Settings button to configure other items. For more information, see Related Information. • If you select the Show Confirmation Screen check box, the Confirmation Screen appears after scanning is finished. Edit the file by rotating or deleting pages or changing the page order if needed, and then click Save to save the scanned image. For more information, see Related Information. • If you select the Show Save / Share Settings check box, the Save / Share settings dialog box appears before saving the scanned image. You can change the Save / Share Settings that have already been set. Adjust the settings if needed, and then click Save to save the scanned image. • When finished selecting new options, you can overwrite the settings as the new default settings or save them as a new scan workflow. Click the Save Settings drop-down list, and then select Overwrite Settings or Save as Workflow. 6. Click (Preview) to preview your image before scanning, if needed. After previewing your image, you must load your document into the machine again. 4
-
 1
1 -
 2
2 -
 3
3 -
 4
4 -
 5
5 -
 6
6 -
 7
7 -
 8
8 -
 9
9 -
 10
10 -
 11
11 -
 12
12 -
13
-
14
-
15
-
16
-
17
-
18
-
19
-
20
-
21
-
22
 |
 |
