Brother International CB3-B917 Service Manual - Page 25
Looper
 |
View all Brother International CB3-B917 manuals
Add to My Manuals
Save this manual to your list of manuals |
Page 25 highlights
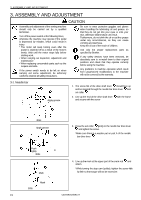
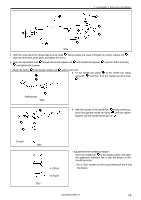
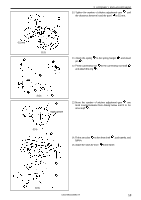
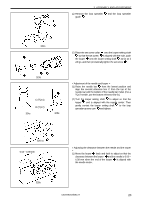
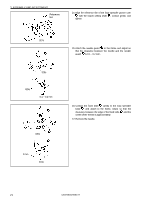
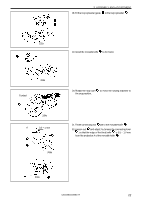
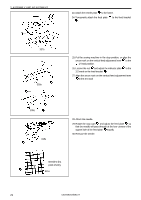
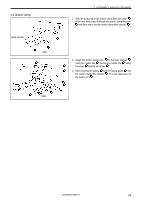
3. ASSEMBLY AND ADJUSTMENT 3-3. Looper Reference Reference a line b line 2 mm 316s Thinner part 1. With the reference line of the loop spreader groove cam facing toward you and upward, fit it to the lower shaft , and temporarily tighten in a position 2 mm from the metal piece. 2. Attach the loop spreader link the loop spreader groove cam frame. to the roller and to , and then install to the 3. Place the thread handler triangular cam onto the looper setting shaft , align the reference lines, and then tighten the two screws a . After this, place the looper setting shaft into the lower shaft , align the grooved cam and the reference lines, and then tighten the two screws b . 4. With the thinner side of the loop spreader base on the left side, install to the frame. 5. Fit the fork of the loop spreader guide to the triangular cam . 6. Fit the loop spreader to the loop spreader guide and to the loop spreader link . 317s 318s Needle lowest position 319s Needle 320s 0.3 - 0.5 mm 7. Install the needle. 8. Tilt the sewing machine downward. 9. Rotate the stop cam until the needle is at the lowest position, and turn the loop spreader groove cam until the loop spreader is extended farthest outward. 10. Move the loop spreader groove cam back and forth to adjust until the clearance between the loop spreader and the needle is 0.3 - 0.5 mm, and then tighten temporarily. 11. Contact the delta cam gently to the loop spreader groove cam and tighten temporarily. Contact lightly 19 321s CB3-B916A/B917A
-
 1
1 -
2
-
3
-
4
-
5
-
6
-
7
-
8
-
9
-
10
-
11
-
12
-
13
-
14
-
15
-
16
-
17
-
18
-
19
-
 20
20 -
 21
21 -
 22
22 -
 23
23 -
 24
24 -
 25
25 -
 26
26 -
 27
27 -
 28
28 -
 29
29 -
 30
30 -
31
-
32
-
33
-
34
-
35
-
36
-
37
-
38
-
39
-
40
-
41
-
42
-
43
-
44
-
45
-
46
-
47
-
48
-
49
-
50
-
51
-
52
-
53
-
54
-
55
-
56
 |
 |
