Brother International CB3-B917 Service Manual - Page 34
Replacement Of Parts
 |
View all Brother International CB3-B917 manuals
Add to My Manuals
Save this manual to your list of manuals |
Page 34 highlights
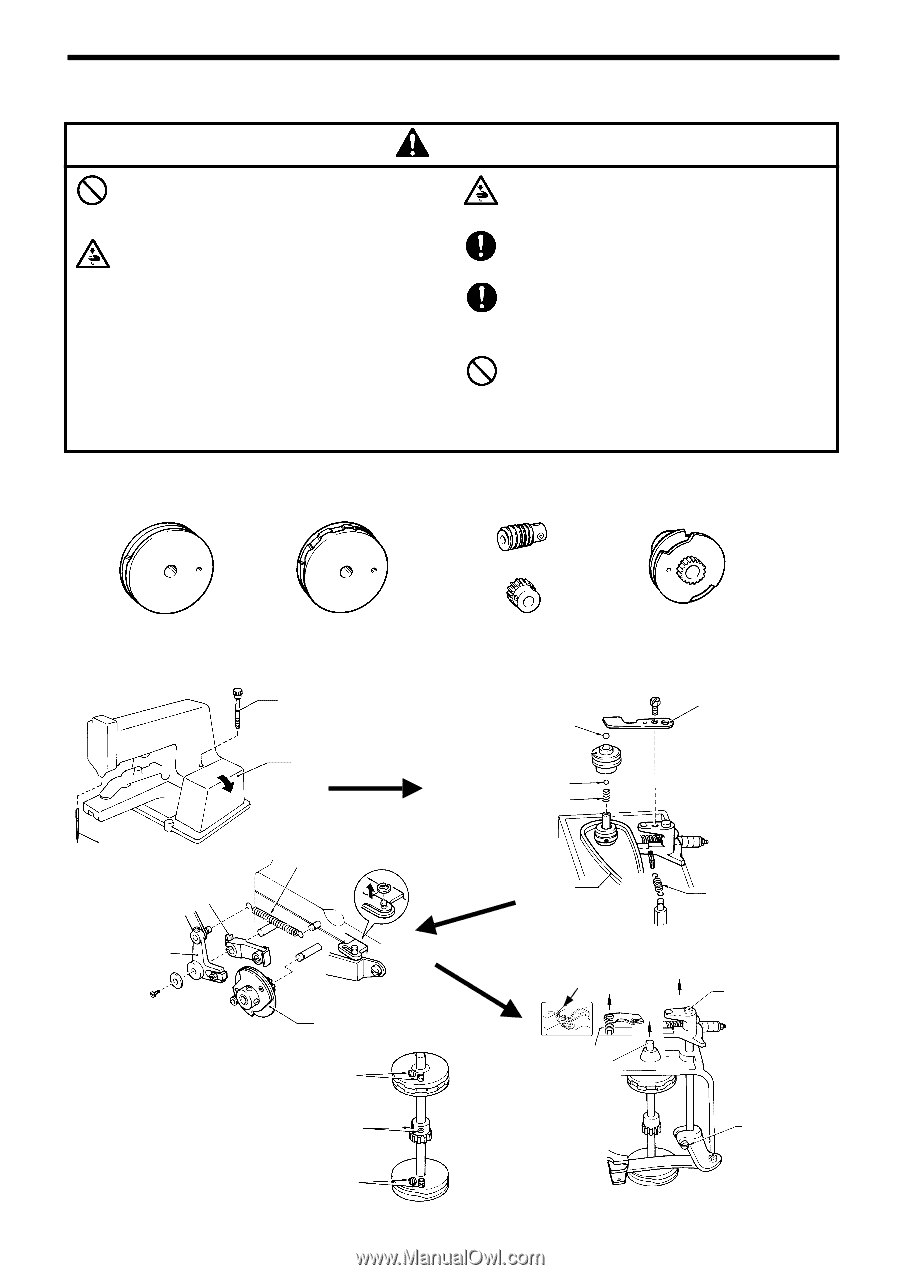
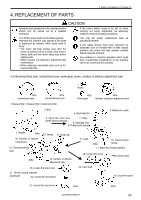
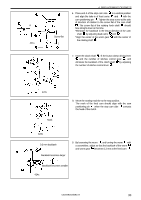
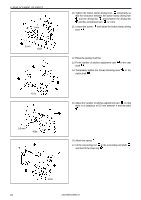
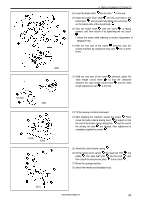
4. REPLACEMENT OF PARTS 4.REPLACEMENT OF PARTS CAUTION Assembly and adjustment of the sewing machine should only be carried out by a qualified technician. If the power switch needs to be left on when carrying out some adjustment, be extremely careful to observe all safety precautions. Turn off the power switch at the following times, otherwise the machine may operate if the pedal is depressed by mistake, which could result in injury. * The motor will keep turning even after the power is switched off as a result of the motor's inertia. Wait until the motor stops fully before starting work. • When carrying out inspection, adjustment and maintenance • When replacing consumable parts such as the loopers and knife. Use only the proper replacement parts as specified by Brother. If any safety devices have been removed, be absolutely sure to re-install them to their original positions and check that they operate correctly before using the machine. Any problems in machine operation which result from unauthorized modifications to the machine will not be covered by the warranty. 4-1.Horizontal feed cam, vertical feed cam, worm gear, worm, number of stitches adjustment cam Worm 401s Vertical feed cam 402s Horizontal feed cam 403s 404s Worm gear Number of stitches adjustment cam < Disassembly > Disassemble in numerical order. 2. Bolt 6. Steel ball 5/16 3. Open the cover and 7. Pulley tilt the sewing machine 8. Steel ball 7/32 9. Pulley return spring 4. Ball presser plate 1. Needle 405s 16. Number of stitches control lever 13. Spring 12. Snap ring 14. Thread trimming lever 408s 15. Number of stitches adjustment cam 23. Loosen the stop screw 17. Tilt the sewing machine downward 22. Loosen the stop screw 5. V-belt 406s 10. Clutch tension spring 11. Raise the sewing machine 18. Loosen the screw 20. Clutch shaft 24. Cam shaft 19. Loose the screw 21. Loosen the stop screw 410s 409s CB3-B916A/B917A 28
-
 1
1 -
2
-
3
-
4
-
5
-
6
-
7
-
8
-
9
-
10
-
11
-
12
-
13
-
14
-
15
-
16
-
17
-
18
-
19
-
20
-
21
-
22
-
23
-
24
-
25
-
26
-
27
-
28
-
 29
29 -
 30
30 -
 31
31 -
 32
32 -
 33
33 -
 34
34 -
 35
35 -
 36
36 -
 37
37 -
 38
38 -
 39
39 -
40
-
41
-
42
-
43
-
44
-
45
-
46
-
47
-
48
-
49
-
50
-
51
-
52
-
53
-
54
-
55
-
56
 |
 |