Brother International CS-8072 Users Manual - English - Page 18
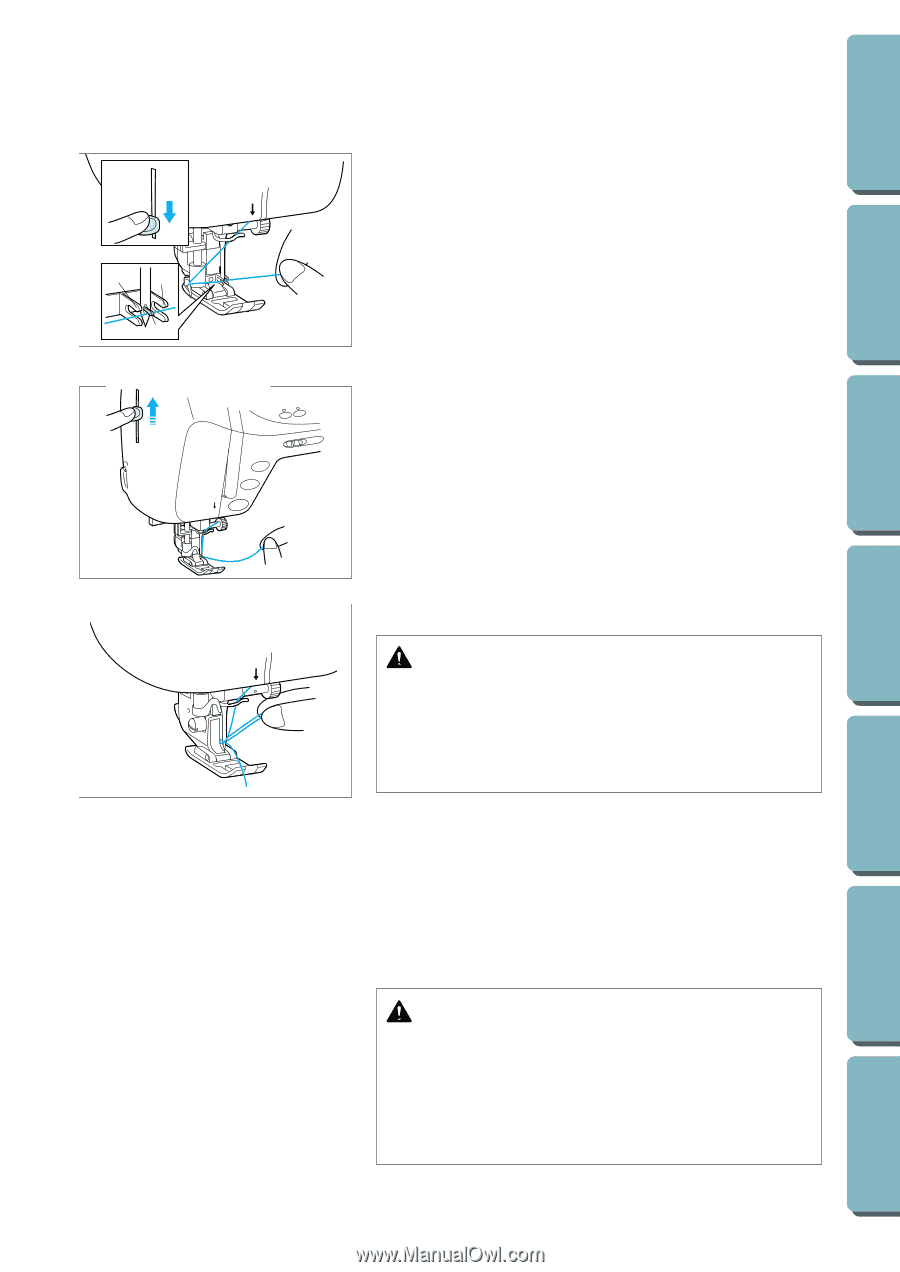
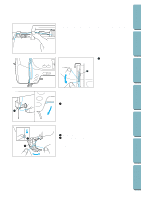
has passed through the eye of the needle., large hook and that the third hook on the needle threader - bobbin
 |
View all Brother International CS-8072 manuals
Add to My Manuals
Save this manual to your list of manuals |
Page 18 highlights
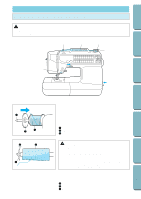
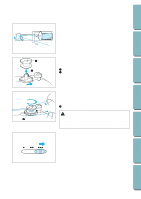
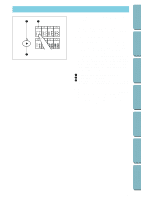
5 11 2 5 5 8. Lower the needle threader lever all the way down using your left index finger. Check that the thread is held by the guide (large hook) and that the third hook on the needle threader has passed through the eye of the needle. 1 Second set of hooks 2 Third hook 9. As you lower the needle threader lever, pull the thread to the left and catch it on the large hook. When the needle threader lever is in the lowest position, pull the thread in front of the needle's eye and catch it on the third hook. * Rotate your right hand slightly to check that the thread is engaged. 10. While gently holding the thread, raise the needle threader lever. 11. Pull the thread towards the rear to finish the upper threading. CAUTION The needle threader lever can only be used with home sewing machine needles size 75/11-100/16. Check the table on page 26 for appropriate needle and thread combinations. Note that, if you are using transparent nylon mono-filament thread, only needles in the range of 90/14-100/16 can be used. 12. Pass the thread underneath the presser foot and pull it out from the rear of the machine by about 50 mm(2"). * You do not need to pull the bobbin thread up before you start sewing. Note Always raise the presser foot before removing the upper thread from the machine or damage may occur to the tension unit. CAUTION The needle threader lever can not be used to thread the needle when you are using decorative threads or specialty needles like the twin needle and wing needle. When using those types of threads or needles, thread the eye of the needle manually. Make sure the main power switch is OFF when threading the needle manually. 15 PATTERNS (PROGRAMMED IN MACHINE) SEWING CHART MAINTENANCE UTILITY STITCHES SEWING BEFORE USE CONTENTS
-
 1
1 -
2
-
3
-
4
-
5
-
6
-
7
-
8
-
9
-
10
-
11
-
12
-
 13
13 -
 14
14 -
 15
15 -
 16
16 -
 17
17 -
 18
18 -
 19
19 -
 20
20 -
 21
21 -
 22
22 -
 23
23 -
24
-
25
-
26
-
27
-
28
-
29
-
30
-
31
-
32
-
33
-
34
-
35
-
36
-
37
-
38
-
39
-
40
-
41
-
42
-
43
-
44
-
45
-
46
-
47
-
48
-
49
-
50
-
51
-
52
-
53
-
54
-
55
-
56
-
57
-
58
-
59
-
60
-
61
-
62
-
63
-
64
-
65
-
66
-
67
-
68
-
69
-
70
-
71
-
72
-
73
-
74
-
75
-
76
-
77
-
78
-
79
-
80
-
81
-
82
 |
 |