Brother International CS-8072 Users Manual - English - Page 31
Thread cutter, Thread, The sewing speed cannot be adjusted while reverse stitches - sewing machine sewing slow
 |
View all Brother International CS-8072 manuals
Add to My Manuals
Save this manual to your list of manuals |
Page 31 highlights
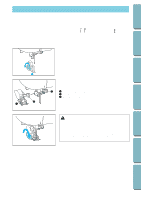
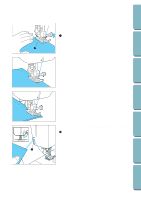
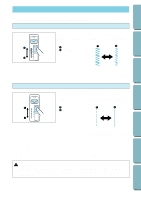
CONTENTS BEFORE USE SEWING 3. While pressing down on the thread and the fabric with your left hand, turn the balance wheel with your right hand to move the needle to the sewing start position. 6 1 Thread * You can begin sewing without drawing up the bobbin thread. 5 6 5 6 4. Lower the presser foot. Press the "REVERSE STITCH" button to sew a few reverse stitches, and then press the "START/ STOP" button. The machine will start sewing at a slow speed. * Reverse stitches are sewn while the "REVERSE STITCH" button is pressed. * The sewing speed cannot be adjusted while reverse stitches are sewn. 5. When sewing is completed, press the "REVERSE STITCH" button to sew a few reverse stitches. * If the needle stop position is set to the down position (the needle stop position switch key's LED lamp is lit), press the "NEEDLE POSITION" button to raise the needle. 6. Raise the presser foot, remove the fabric and cut the thread. 1 Thread cutter 1 UTILITY STITCHES MAINTENANCE SEWING CHART PATTERNS (PROGRAMMED IN MACHINE) 28
-
 1
1 -
2
-
3
-
4
-
5
-
6
-
7
-
8
-
9
-
10
-
11
-
12
-
13
-
14
-
15
-
16
-
17
-
18
-
19
-
20
-
21
-
22
-
23
-
24
-
25
-
 26
26 -
 27
27 -
 28
28 -
 29
29 -
 30
30 -
 31
31 -
 32
32 -
 33
33 -
 34
34 -
 35
35 -
 36
36 -
37
-
38
-
39
-
40
-
41
-
42
-
43
-
44
-
45
-
46
-
47
-
48
-
49
-
50
-
51
-
52
-
53
-
54
-
55
-
56
-
57
-
58
-
59
-
60
-
61
-
62
-
63
-
64
-
65
-
66
-
67
-
68
-
69
-
70
-
71
-
72
-
73
-
74
-
75
-
76
-
77
-
78
-
79
-
80
-
81
-
82
 |
 |
