Brother International DCP-130C Quick Setup Guide - English - Page 10
Print quality check, Choosing your language, Canada only
 |
UPC - 012502615699
View all Brother International DCP-130C manuals
Add to My Manuals
Save this manual to your list of manuals |
Page 10 highlights
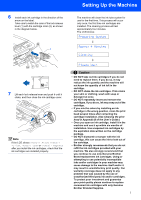
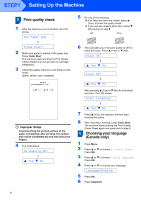
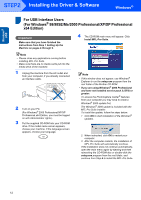
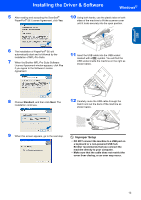
STEP1 Setting Up the Machine 5 Print quality check 1 After the cleaning cycle is finished, the LCD shows: Set Paper and q Press Start 2 Make sure paper is loaded in the paper tray. Press Color Start. The machine starts printing the Print Quality Check Sheet (only during initial ink cartridge installation). 3 Check the quality of the four color blocks on the sheet. (black/ yellow/ cyan/ magenta) Improper Setup Avoid touching the printed surface of the paper immediately after printing, the surface may not be completely dry and may stain your fingers. 4 The LCD shows: Is Quality OK? q a Yes b No 5 Do one of the following: „ If all lines are clear and visible, press a (Yes) to finish the quality check. „ If you can see missing short lines, press b (No) and go to step 6. OK Poor 6 The LCD asks you if the print quality is OK for black and color. Press a (Yes) or b (No) . Black OK? q a Yes b No Color OK? q a Yes b No After pressing a (Yes) or b (No) for both black and color, the LCD shows: Start Cleaning? q a Yes b No 7 Press a (Yes), the machine will then start cleaning the colors. 8 After cleaning is finished, press Color Start. The machine starts printing the Print Quality Check Sheet again and goes back to step 3. 6 Choosing your language (Canada only) 1 Press Menu. 2 Press a or b to choose 0.Initial Setup Press OK. 3 Press a or b to choose 0.Local Language Press OK. 4 Press a or b to choose your language. Language:English 5 Press OK. 6 Press Stop/Exit. 8
-
 1
1 -
2
-
3
-
4
-
 5
5 -
 6
6 -
 7
7 -
 8
8 -
 9
9 -
 10
10 -
 11
11 -
 12
12 -
 13
13 -
 14
14 -
 15
15 -
16
-
17
-
18
-
19
-
20
-
21
-
22
 |
 |
