Brother International DCP-130C Quick Setup Guide - English - Page 6
Step1 - tape
 |
UPC - 012502615699
View all Brother International DCP-130C manuals
Add to My Manuals
Save this manual to your list of manuals |
Page 6 highlights
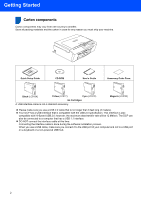
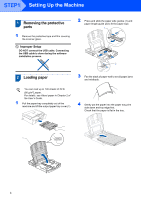
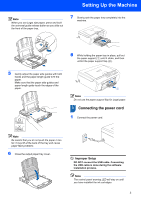
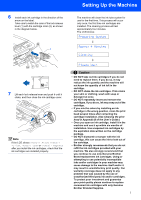
STEP1 Setting Up the Machine 1 1 Removing the protective parts 1 Remove the protective tape and film covering the scanner glass. Improper Setup DO NOT connect the USB cable. Connecting the USB cable is done during the software installation process. 2 Press and slide the paper side guides (1) and paper length guide (2) to fit the paper size. 1 2 2 Loading paper 3 Fan the stack of paper well to avoid paper jams and misfeeds. You can load up to 100 sheets of 20 lb (80 g/m2) paper. For details, see About paper in Chapter 2 of the User's Guide. 1 Pull the paper tray completely out of the machine and lift the output paper tray cover (1). 4 Gently put the paper into the paper tray print side down and top edge first. Check that the paper is flat in the tray. 1 4
-
 1
1 -
 2
2 -
 3
3 -
 4
4 -
 5
5 -
 6
6 -
 7
7 -
 8
8 -
 9
9 -
 10
10 -
 11
11 -
 12
12 -
13
-
14
-
15
-
16
-
17
-
18
-
19
-
20
-
21
-
22
 |
 |
