Brother International DS-620 BR-Receipts Users Guide Windows - Page 21
Importing Receipts, Auto Detect
 |
View all Brother International DS-620 manuals
Add to My Manuals
Save this manual to your list of manuals |
Page 21 highlights
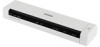
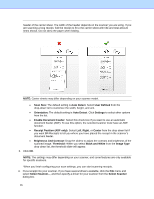
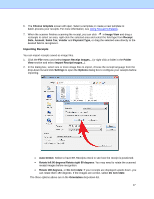
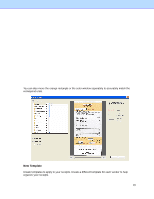
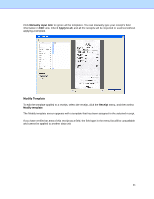
5. Click the File menu and select Scan Receipt... (or right-click a receipt box in the Folder View section and select Scan Receipt...). 6. The Choose template screen will open. Select a template or create a new template to batch-process your receipts. For more information, see Using Receipt Templates. 7. When the scanner finishes scanning the receipt, you can click in Image View and drag a rectangle to select an area, right-click the selected area and select the field type from Receipt Date, Amount, Sales Tax, Vendor and Payment Type, or drag the selected area directly to the desired field to recognize it. Importing Receipts You can import receipts saved as image files. 1. Click the File menu and select Import Receipt Images... (or right-click a folder in the Folder View section and select Import Receipt Images...). 2. In the dialog box, select one or more image files to import, choose the receipt language from the drop-down list and click Settings to open the Options dialog box to configure your receipts before importing. • Auto Detect: Select to have BR-Receipts check to see how the receipt is positioned. • Rotate left 90 degrees/Rotate right 90 degrees: You may need to rotate the scanned receipt images before recognition. • Rotate 180 degrees, or Do not rotate: If your receipts are displayed upside down, you can rotate them 180 degrees. If the images are correct, select Do not rotate. The three options above are in the Orientation drop-down list. 17
-
 1
1 -
2
-
3
-
4
-
5
-
6
-
7
-
8
-
9
-
10
-
11
-
12
-
13
-
14
-
15
-
 16
16 -
 17
17 -
 18
18 -
 19
19 -
 20
20 -
 21
21 -
 22
22 -
 23
23 -
 24
24 -
 25
25 -
 26
26 -
27
-
28
-
29
-
30
-
31
-
32
-
33
 |
 |