Brother International DS-620 BR-Receipts Users Guide Windows - Page 30
Menu Commands, File Menu - driver
 |
View all Brother International DS-620 manuals
Add to My Manuals
Save this manual to your list of manuals |
Page 30 highlights
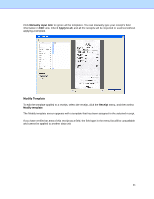
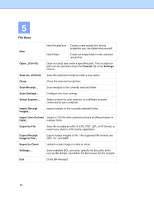
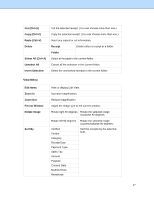
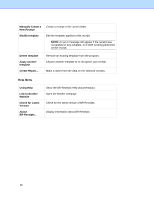
5 Menu Commands File Menu New New Receipt Box Create a new receipt box whose properties you can determine yourself. New Folder Create an empty folder in the selected receipt box. Open...(Ctrl+O) Open a receipt box under a specified path. This receipt box path can be specified under the General tab in the Settings screen. Save As...(Ctrl+S) Save the selected receipt box with a new name. Close Close the selected receipt box. Scan Receipt... Scan receipts to the currently selected folder. Scan Settings... Configure the scan settings. Select Scanner... Select a driver for your scanner, or a different scanner connected to your computer. Import Receipt Images... Import receipts to the currently selected folder. Import User Defined Import a CSV file with customized items of different types in Field... multiple fields. Export to File Save the receipts as a file in CSV, PDF, QIF, or IIF format, or export your data to a third party application. Export Receipt Image to File... Export receipt images to file. The supported file formats are JPG, TIF, and BMP. Export to Cloud Upload receipt images or data to cloud. Settings... Save available BOL accounts, specify the box path, enter user profile details, and define the field values for the receipts. Exit Close BR-Receipts. 26
-
 1
1 -
2
-
3
-
4
-
5
-
6
-
7
-
8
-
9
-
10
-
11
-
12
-
13
-
14
-
15
-
16
-
17
-
18
-
19
-
20
-
21
-
22
-
23
-
24
-
 25
25 -
 26
26 -
 27
27 -
 28
28 -
 29
29 -
 30
30 -
 31
31 -
 32
32 -
 33
33
 |
 |