Brother International Entrepreneur Pro PR-1000 Kit 1 Instruction Manual - Engl - Page 22
Changing the Position of a Sticker, Select the first pattern for practicing [1],
 |
View all Brother International Entrepreneur Pro PR-1000 manuals
Add to My Manuals
Save this manual to your list of manuals |
Page 22 highlights
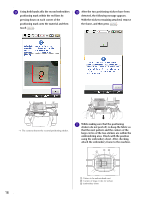
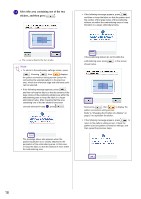
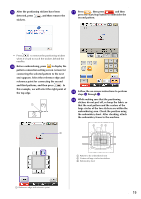
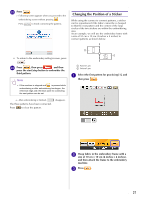
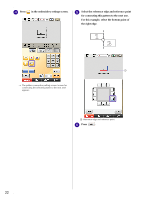
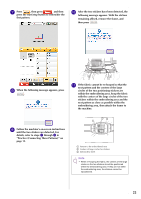
w Press . → Following screen appears when you proceed to the embroidering screen without pressing . Press to finish connecting the patterns. Changing the Position of a Sticker While using the camera to connect patterns, a sticker can be repositioned if the fabric cannot be re-hooped so that the next pattern and the centers of the large circles of the two stickers are within the embroidering area. As an example, we will use the embroidery frame with a size of 10 cm × 10 cm (4 inches × 4 inches) to connect patterns as shown below. • To return to the embroidery settings screen, press . x Press , then press and then press the start/stop button to embroider the third pattern. Note • If the machine is stopped and is pressed while embroidering or after embroidering has begun, the reference edge and reference point for connecting the next pattern can be set. a Pattern1.pes b Pattern2.pes a Select the first pattern for practicing [1], and then press . → After embroidering is finished, The three patterns have been connected. Press to clear the pattern. disappears. b Hoop fabric in the embroidery frame with a size of 10 cm × 10 cm (4 inches × 4 inches), and then attach the frame to the embroidery machine. c Press . 21
-
 1
1 -
2
-
3
-
4
-
5
-
6
-
7
-
8
-
9
-
10
-
11
-
12
-
13
-
14
-
15
-
16
-
 17
17 -
 18
18 -
 19
19 -
 20
20 -
 21
21 -
 22
22 -
 23
23 -
 24
24 -
 25
25 -
 26
26 -
 27
27 -
28
-
29
-
30
-
31
-
32
-
33
-
34
-
35
-
36
-
37
-
38
-
39
-
40
-
41
-
42
 |
 |