Brother International Entrepreneur Pro PR-1000 Kit 1 Instruction Manual - Engl - Page 4
Displaying The Fabric While Aligning The Embroidery Position
 |
View all Brother International Entrepreneur Pro PR-1000 manuals
Add to My Manuals
Save this manual to your list of manuals |
Page 4 highlights
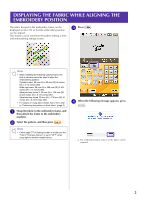
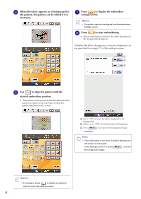
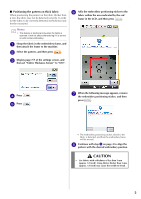
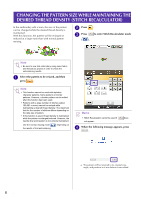
DISPLAYING THE FABRIC WHILE ALIGNING THE EMBROIDERY POSITION The fabric hooped in the embroidery frame can be displayed on the LCD so that the embroidery position c Press . can be aligned. This feature can be used from the pattern editing screen and embroidering settings screen. Note • When installing the following optional frame, the built-in camera cannot be used to align the embroidering position: Cylinder frame, 80 mm (H) × 90 mm (W) (3 inches (H) × 3-1/2 inches (W)) Wide cap frame, 60 mm (H) × 360 mm (W) (2-3/8 inches (H) × 14 inches (W)) Advanced cap frame 2, 60 mm (H) × 130 mm (W) (2-3/8 inches (H) × 5-1/8 inches (W)) Advanced cap frame, 50 mm (H) × 130 mm (W) (2 inches (H) × 5-1/8 inches (W)). • For details on using fabric thicker than 2 mm, refer to "Positioning the pattern on thick fabric" (page 5). a Hoop the fabric in the embroidery frame, and then attach the frame to the embroidery machine. b Select the pattern, and then press . Note • Check page 7/7 of Settings screen to make sure the "Fabric Thickness Sensor" is set to "OFF" when using light to medium weight fabrics. d When the following message appears, press . → The embroidery frame moves so the fabric can be scanned. 3
-
 1
1 -
 2
2 -
 3
3 -
 4
4 -
 5
5 -
 6
6 -
 7
7 -
 8
8 -
 9
9 -
 10
10 -
11
-
12
-
13
-
14
-
15
-
16
-
17
-
18
-
19
-
20
-
21
-
22
-
23
-
24
-
25
-
26
-
27
-
28
-
29
-
30
-
31
-
32
-
33
-
34
-
35
-
36
-
37
-
38
-
39
-
40
-
41
-
42
 |
 |
