Brother International HL-4570CDWT Users Manual - English - Page 70
Cancel, Secure, + or - button, Moving through menus on the LCD, Entering numbers, Back, OK
 |
UPC - 012502625339
View all Brother International HL-4570CDWT manuals
Add to My Manuals
Save this manual to your list of manuals |
Page 70 highlights
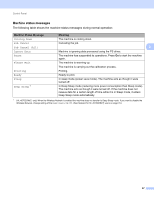
Control Panel Cancel 3 You can cancel the processing or printing of data by pressing Cancel. The LCD shows Cancel printing. until the job is canceled. To delete all jobs, press Cancel for about 4 seconds until the LCD shows Job Cancel (All) and then release it. After canceling the job, the machine returns to the Ready state. Pressing Cancel will exit the control panel menu and return the machine to the Ready state. 3 Secure 3 If you want to print secure data protected by a password, press Secure. For details, see Printing Secure data on page 69. + or - button 3 Moving through menus on the LCD 3 Pressing + or - when the machine is in the Ready state, takes it offline and the LCD will show the control panel menu. Press to scroll through the menus and options. Press the button until you see the setting you want. Entering numbers 3 You can enter numbers in two ways. You can press + or - to move up or down one number at a time, or you can hold down + or - to move faster. When you see the number you want, press OK. Back 3 Pressing Back when the machine is in the Ready state takes it offline, and the LCD will show the control panel menu. Pressing Back allows you to return to the previous level from the current menu level. Back also allows you to choose the previous digit while setting numbers. When you choose a setting and it does not have an asterisk (OK was not pressed), Back allows you to return to the previous menu level with the original setting unchanged. OK 3 Pressing OK when the machine is in the Ready state takes it offline, and the LCD will show the control panel menu. Pressing OK allows you to choose the displayed menu or option. After changing a setting, the LCD shows Accepted and then the machine returns to the previous menu level. Note The options you have chosen are shown with an asterisk at the end of the display. Since the asterisk shows what you have chosen, you can easily see the current settings as you look through the LCD. 64
-
 1
1 -
2
-
3
-
4
-
5
-
6
-
7
-
8
-
9
-
10
-
11
-
12
-
13
-
14
-
15
-
16
-
17
-
18
-
19
-
20
-
21
-
22
-
23
-
24
-
25
-
26
-
27
-
28
-
29
-
30
-
31
-
32
-
33
-
34
-
35
-
36
-
37
-
38
-
39
-
40
-
41
-
42
-
43
-
44
-
45
-
46
-
47
-
48
-
49
-
50
-
51
-
52
-
53
-
54
-
55
-
56
-
57
-
58
-
59
-
60
-
61
-
62
-
63
-
64
-
 65
65 -
 66
66 -
 67
67 -
 68
68 -
 69
69 -
 70
70 -
 71
71 -
 72
72 -
 73
73 -
 74
74 -
 75
75 -
76
-
77
-
78
-
79
-
80
-
81
-
82
-
83
-
84
-
85
-
86
-
87
-
88
-
89
-
90
-
91
-
92
-
93
-
94
-
95
-
96
-
97
-
98
-
99
-
100
-
101
-
102
-
103
-
104
-
105
-
106
-
107
-
108
-
109
-
110
-
111
-
112
-
113
-
114
-
115
-
116
-
117
-
118
-
119
-
120
-
121
-
122
-
123
-
124
-
125
-
126
-
127
-
128
-
129
-
130
-
131
-
132
-
133
-
134
-
135
-
136
-
137
-
138
-
139
-
140
-
141
-
142
-
143
-
144
-
145
-
146
-
147
-
148
-
149
-
150
-
151
-
152
-
153
-
154
-
155
-
156
-
157
-
158
-
159
-
160
-
161
-
162
-
163
-
164
-
165
-
166
-
167
-
168
-
169
-
170
-
171
-
172
-
173
-
174
-
175
-
176
-
177
-
178
-
179
-
180
-
181
-
182
-
183
-
184
-
185
-
186
-
187
-
188
-
189
-
190
-
191
-
192
-
193
-
194
-
195
-
196
-
197
-
198
-
199
 |
 |