Brother International JX2517 Users Manual - English and Spanish - Page 11
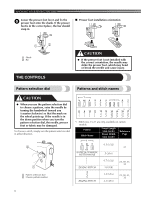
Pattern, Preset Length, mm inch, Reference, Stitch Name, Preset Width - stitches
 |
View all Brother International JX2517 manuals
Add to My Manuals
Save this manual to your list of manuals |
Page 11 highlights
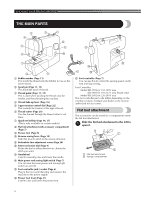
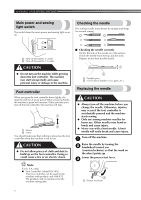
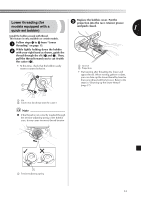
Pattern Stitch Name Preset Length (mm (inch)) Preset Width (mm (inch)) Reference Page Pattern Preset Length (mm (inch)) Reference Stitch Name Preset Width (mm (inch)) Page 1 4 ZIGZAG STITCH 2 (1/16) 5 (3/16) 23, 30, 31, 33 14 STRETCH BLIND HEM STITCH 2 (1/16) 5 (3/16) 24, 33 5 0.5 (1/32) 23, 30 15 2 (1/16) 25 ZIGZAG (SATIN) STITCH 6 STRAIGHT STITCH (Center Needle Position) 7 STRAIGHT STITCH (Center Needle Position) 8 STRAIGHT STITCH (Center Needle Position) 9 STRAIGHT STITCH (Center Needle Position) 5 (3/16) 1.6 (1/16) - 1.8 (1/8) - 2 (1/16) - 3 (1/8) - 23, 32 23, 32 23, 32 23, 29, 30, 32, 33 OVEREDGE STITCH 5 (3/16) 16 1.2 (1/16) 26 DOUBLE ACTION STITCH 5 (3/16) 17 1.2 (1/16) 26 BRIDGING STITCH 5 (3/16) Reverse sewing lever You can use reverse sewing for back tacking and reinforcing seams. To sew in reverse, push the reverse sewing lever in as far as possible and hold it in that position while you lightly push the foot controller. To sew forward, release the reverse sewing lever. The machine will then sew forward. The length of reverse stitches is fixed at 2 mm (1/16 inch). 10 4 (3/16) 23, 32 STRAIGHT STITCH (Center Needle - Position) 1 11 STRAIGHT STITCH (Left Needle Position) 2.5 (3/32) - 23, 30, 32 1 Reverse sewing lever 12 2 (1/16) 24, 33 BLIND HEM STITCH 5 (3/16) 13 1 (1/16) 25 ELASTIC STITCH 5 (3/16) 10
-
 1
1 -
2
-
3
-
4
-
5
-
 6
6 -
 7
7 -
 8
8 -
 9
9 -
 10
10 -
 11
11 -
 12
12 -
 13
13 -
 14
14 -
 15
15 -
 16
16 -
17
-
18
-
19
-
20
-
21
-
22
-
23
-
24
-
25
-
26
-
27
-
28
-
29
-
30
-
31
-
32
-
33
-
34
-
35
-
36
-
37
-
38
-
39
-
40
-
41
-
42
-
43
-
44
-
45
-
46
-
47
-
48
-
49
-
50
-
51
-
52
-
53
-
54
-
55
-
56
-
57
-
58
-
59
-
60
-
61
-
62
-
63
-
64
-
65
-
66
-
67
-
68
-
69
-
70
-
71
-
72
-
73
-
74
-
75
-
76
-
77
-
78
-
79
-
80
 |
 |
