Brother International JX2517 Users Manual - English and Spanish - Page 14
Lower threading - drawing up lower thread
 |
View all Brother International JX2517 manuals
Add to My Manuals
Save this manual to your list of manuals |
Page 14 highlights
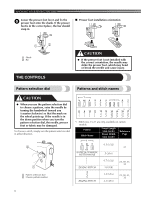
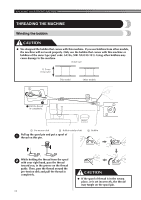
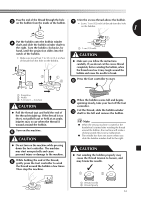
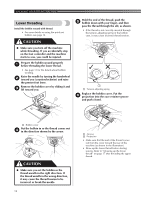
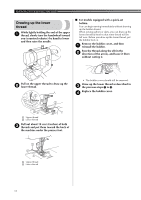
KNOWING YOUR SEWING MACHINE Lower threading Install the bobbin wound with thread. • For more details on using the quick-set bobbin, see page 14. CAUTION ● Make sure you turn off the machine while threading. If you accidentally step on the foot controller and the machine starts to sew, you could be injured. Prepare the bobbin wound properly 1 before threading the lower thread. • See page 11 for the details about bobbin winding. Raise the needle by turning the handwheel 2 toward you (counterclockwise) and raise the presser foot lever. Remove the bobbin cover by sliding it and 3 lift toward you. 1 Hold the end of the thread, push the 5 bobbin down with your finger, and then pass the thread through the slit, as shown. • If the thread is not correctly inserted through the tension-adjusting spring of the bobbin case, it may cause incorrect thread tension. 1 1 Tension-adjusting spring Replace the bobbin cover. Put the 6 projection into the race retainer groove and push closed. 1 Bobbin cover Put the bobbin in so the thread comes out 4 in the direction shown by the arrow. CAUTION ● Make sure you set the bobbin so the thread unrolls in the right direction. If the thread unrolls in the wrong direction, it may cause the thread tension to be incorrect or break the needle. 13 1 2 1 Groove 2 Projection • Make sure that the end of the thread comes out from the cover toward the rear of the machine (as shown in the illustration). • Draw up the lower thread before starting sewing. Refer to "Drawing up the lower thread" on page 17 after threading the upper thread.
-
 1
1 -
2
-
3
-
4
-
5
-
6
-
7
-
8
-
 9
9 -
 10
10 -
 11
11 -
 12
12 -
 13
13 -
 14
14 -
 15
15 -
 16
16 -
 17
17 -
 18
18 -
 19
19 -
20
-
21
-
22
-
23
-
24
-
25
-
26
-
27
-
28
-
29
-
30
-
31
-
32
-
33
-
34
-
35
-
36
-
37
-
38
-
39
-
40
-
41
-
42
-
43
-
44
-
45
-
46
-
47
-
48
-
49
-
50
-
51
-
52
-
53
-
54
-
55
-
56
-
57
-
58
-
59
-
60
-
61
-
62
-
63
-
64
-
65
-
66
-
67
-
68
-
69
-
70
-
71
-
72
-
73
-
74
-
75
-
76
-
77
-
78
-
79
-
80
 |
 |
