Brother International MFC 5440CN Users Manual - English - Page 146
Checking the printing alignment, Menu/Set, Black Start, Color Start, Stop/Exit
 |
UPC - 012502610915
View all Brother International MFC 5440CN manuals
Add to My Manuals
Save this manual to your list of manuals |
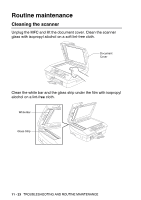
Page 146 highlights
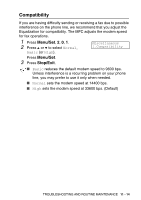
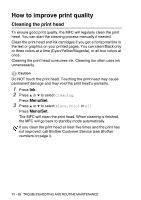
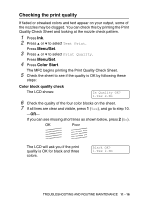
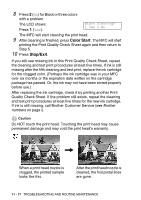
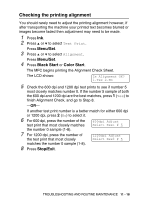
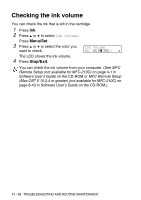
Checking the printing alignment You should rarely need to adjust the printing alignment however, if after transporting the machine your printed text becomes blurred or images become faded then adjustment may need to be made. 1 Press Ink. 2 Press ▲ or ▼ to select Test Print. Press Menu/Set. 3 Press ▲ or ▼ to select Alignment. Press Menu/Set. 4 Press Black Start or Color Start. The MFC begins printing the Alignment Check Sheet. The LCD shows: Is Alignment OK? 1.Yes 2.No 5 Check the 600 dpi and 1200 dpi test prints to see if number 5 most closely matches number 0. If the number 5 sample of both the 600 dpi and 1200 dpi are the best matches, press 1 (Yes) to finish Alignment Check, and go to Step 8. -OR- If another test print number is a better match for either 600 dpi or 1200 dpi, press 2 (No) to select it. 6 For 600 dpi, press the number of the test print that most closely matches 600dpi Adjust Select Best # 5 the number 0 sample (1-8). 7 For 1200 dpi, press the number of 1200dpi Adjust the test print that most closely Select Best # 5 matches the number 0 sample (1-8). 8 Press Stop/Exit. TROUBLESHOOTING AND ROUTINE MAINTENANCE 11 - 18
-
 1
1 -
2
-
3
-
4
-
5
-
6
-
7
-
8
-
9
-
10
-
11
-
12
-
13
-
14
-
15
-
16
-
17
-
18
-
19
-
20
-
21
-
22
-
23
-
24
-
25
-
26
-
27
-
28
-
29
-
30
-
31
-
32
-
33
-
34
-
35
-
36
-
37
-
38
-
39
-
40
-
41
-
42
-
43
-
44
-
45
-
46
-
47
-
48
-
49
-
50
-
51
-
52
-
53
-
54
-
55
-
56
-
57
-
58
-
59
-
60
-
61
-
62
-
63
-
64
-
65
-
66
-
67
-
68
-
69
-
70
-
71
-
72
-
73
-
74
-
75
-
76
-
77
-
78
-
79
-
80
-
81
-
82
-
83
-
84
-
85
-
86
-
87
-
88
-
89
-
90
-
91
-
92
-
93
-
94
-
95
-
96
-
97
-
98
-
99
-
100
-
101
-
102
-
103
-
104
-
105
-
106
-
107
-
108
-
109
-
110
-
111
-
112
-
113
-
114
-
115
-
116
-
117
-
118
-
119
-
120
-
121
-
122
-
123
-
124
-
125
-
126
-
127
-
128
-
129
-
130
-
131
-
132
-
133
-
134
-
135
-
136
-
137
-
138
-
139
-
140
-
 141
141 -
 142
142 -
 143
143 -
 144
144 -
 145
145 -
 146
146 -
 147
147 -
 148
148 -
 149
149 -
 150
150 -
 151
151 -
152
-
153
-
154
-
155
-
156
-
157
-
158
-
159
-
160
-
161
-
162
-
163
-
164
-
165
-
166
-
167
-
168
-
169
-
170
-
171
-
172
-
173
-
174
-
175
-
176
-
177
-
178
-
179
-
180
-
181
-
182
-
183
-
184
-
185
-
186
-
187
-
188
-
189
-
190
-
191
-
192
-
193
-
194
-
195
-
196
-
197
-
198
-
199
-
200
-
201
-
202
-
203
-
204
-
205
-
206
-
207
-
208
-
209
-
210
-
211
 |
 |