Brother International MFC 8840D Network Users Manual - English - Page 55
Adding a Second Brother Internet Port, Windows® 2000/XP IPP Printing
 |
UPC - 012502610359
View all Brother International MFC 8840D manuals
Add to My Manuals
Save this manual to your list of manuals |
Page 55 highlights
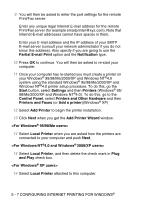
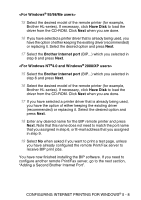
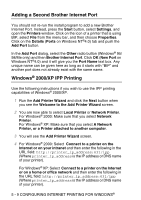
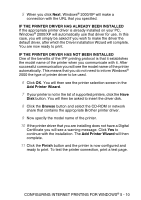
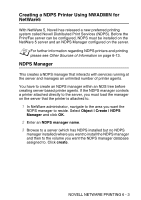
Adding a Second Brother Internet Port You should not re-run the install program to add a new Brother Internet Port. Instead, press the Start button, select Settings, and open the Printers window. Click on the icon of a printer that is using BIP, select File from the menu bar, and then choose Properties. Click on the Details (Ports on Windows NT®4.0) tab and push the Add Port button. In the Add Port dialog, select the Other radio button (Windows® 95/ 98/Me only) and then Brother Internet Port. Click OK (New Port on Windows NT®4.0) and it will give you the Port Name text box. Any unique name can be given here as long as it starts with "BIP" and another port does not already exist with the same name. Windows® 2000/XP IPP Printing Use the following instructions if you wish to use the IPP printing capabilities of Windows® 2000/XP. 1 Run the Add Printer Wizard and click the Next button when you see the Welcome to the Add Printer Wizard screen. 2 You are now able to select Local Printer or Network Printer. For Windows® 2000: Make sure that you select Network Printer. For Windows® XP: Make sure that you select A Network Printer, or a Printer attached to another computer. 3 You will see the Add Printer Wizard screen. 4 For Windows® 2000: Select Connect to a printer on the Internet or on your intranet and then enter the following in the URL field: http://printer_ip_address:631/ipp (Where printer_ip_address is the IP address or DNS name of your printer). For Windows® XP: Select Connect to a printer on the Internet or on a home or office network and then enter the following in the URL field: http://printer_ip_address:631/ipp (Where printer_ip_address is the IP address or DNS name of your printer). 5 - 9 CONFIGURING INTERNET PRINTING FOR WINDOWS®
-
 1
1 -
2
-
3
-
4
-
5
-
6
-
7
-
8
-
9
-
10
-
11
-
12
-
13
-
14
-
15
-
16
-
17
-
18
-
19
-
20
-
21
-
22
-
23
-
24
-
25
-
26
-
27
-
28
-
29
-
30
-
31
-
32
-
33
-
34
-
35
-
36
-
37
-
38
-
39
-
40
-
41
-
42
-
43
-
44
-
45
-
46
-
47
-
48
-
49
-
 50
50 -
 51
51 -
 52
52 -
 53
53 -
 54
54 -
 55
55 -
 56
56 -
 57
57 -
 58
58 -
 59
59 -
 60
60 -
61
-
62
-
63
-
64
-
65
-
66
-
67
-
68
-
69
-
70
-
71
-
72
-
73
-
74
-
75
-
76
-
77
-
78
-
79
-
80
-
81
-
82
-
83
-
84
-
85
-
86
-
87
-
88
-
89
-
90
-
91
-
92
-
93
-
94
-
95
-
96
-
97
-
98
-
99
-
100
-
101
-
102
-
103
-
104
-
105
-
106
-
107
-
108
-
109
-
110
-
111
-
112
-
113
-
114
-
115
-
116
-
117
-
118
-
119
-
120
-
121
-
122
-
123
-
124
-
125
-
126
-
127
-
128
-
129
-
130
-
131
-
132
-
133
-
134
-
135
-
136
-
137
-
138
-
139
-
140
-
141
-
142
-
143
-
144
-
145
-
146
-
147
-
148
-
149
-
150
-
151
-
152
-
153
-
154
-
155
-
156
-
157
-
158
-
159
-
160
-
161
-
162
-
163
-
164
-
165
-
166
-
167
-
168
-
169
-
170
-
171
-
172
-
173
-
174
-
175
-
176
 |
 |
