Brother International MFC 8840D Network Users Manual - English - Page 90
Front Panel Setup Menu, LAN Main Setup Menu - scanner
 |
UPC - 012502610359
View all Brother International MFC 8840D manuals
Add to My Manuals
Save this manual to your list of manuals |
Page 90 highlights
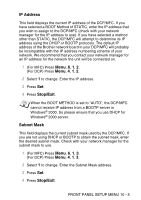
10 Front Panel Setup Menu 10 LAN Main Setup Menu With the Network (LAN) Board (NC-9100h Print/Fax Server) installed, you can connect your machine into the network to use the Internet FAX, Network Scanner and Network Printer. 1 Install the Network (LAN) Board (NC-9100h). For more information, see Chapter 23 of User's Guide included with the machine. 2 Set up the machine for your Network using the control panel. You can also set up using BRAdmin, Web BRAdmin software and so on. For more information, see Chapter 11 or visit at: http://solutions.brother.com. The LAN menu selections allow you to setup the Brother DCP/MFC for your network and Internet Fax configuration. Press Menu then press the appropriate number for LAN, based on the selections displayed on your machine. After you have displayed the LAN Main Setup menu, there are seven main selections: Setup TCP/IP, Setup Internet, Setup Mail RX, Setup Mail TX, Setup Relay, Setup Misc and Scan to E-mail. Proceed to the menu selection you wish to configure. Please note that once you have specified a valid IP address for the machine, it is also possible to configure many aspects of the DCP/ MFC using your favorite web browser. For added flexibility, the DCP/ MFC is supplied with the BRAdmin Professional Windows® software, which also can be used to configure many aspects of the NC-9100h. FRONT PANEL SETUP MENU 10 - 1
-
 1
1 -
2
-
3
-
4
-
5
-
6
-
7
-
8
-
9
-
10
-
11
-
12
-
13
-
14
-
15
-
16
-
17
-
18
-
19
-
20
-
21
-
22
-
23
-
24
-
25
-
26
-
27
-
28
-
29
-
30
-
31
-
32
-
33
-
34
-
35
-
36
-
37
-
38
-
39
-
40
-
41
-
42
-
43
-
44
-
45
-
46
-
47
-
48
-
49
-
50
-
51
-
52
-
53
-
54
-
55
-
56
-
57
-
58
-
59
-
60
-
61
-
62
-
63
-
64
-
65
-
66
-
67
-
68
-
69
-
70
-
71
-
72
-
73
-
74
-
75
-
76
-
77
-
78
-
79
-
80
-
81
-
82
-
83
-
84
-
 85
85 -
 86
86 -
 87
87 -
 88
88 -
 89
89 -
 90
90 -
 91
91 -
 92
92 -
 93
93 -
 94
94 -
 95
95 -
96
-
97
-
98
-
99
-
100
-
101
-
102
-
103
-
104
-
105
-
106
-
107
-
108
-
109
-
110
-
111
-
112
-
113
-
114
-
115
-
116
-
117
-
118
-
119
-
120
-
121
-
122
-
123
-
124
-
125
-
126
-
127
-
128
-
129
-
130
-
131
-
132
-
133
-
134
-
135
-
136
-
137
-
138
-
139
-
140
-
141
-
142
-
143
-
144
-
145
-
146
-
147
-
148
-
149
-
150
-
151
-
152
-
153
-
154
-
155
-
156
-
157
-
158
-
159
-
160
-
161
-
162
-
163
-
164
-
165
-
166
-
167
-
168
-
169
-
170
-
171
-
172
-
173
-
174
-
175
-
176
 |
 |
