Brother International NX-400 Users Manual - English - Page 19
Checking machine operating procedures - sewing manual
 |
View all Brother International NX-400 manuals
Add to My Manuals
Save this manual to your list of manuals |
Page 19 highlights
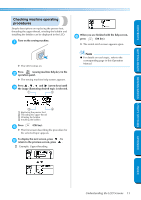
CONTENTS GETTING READY SEWING BASICS UTILITY STITCHES Checking machine operating procedures Simple descriptions on replacing the presser foot, threading the upper thread, winding the bobbin and installing the bobbin can be displayed in the LCD. Turn on the sewing machine. 1 When you are finished with the help screen, 6 press (OK key). X The initial stitch screen appears again. X The LCD comes on. Press (sewing machine help key) in the 2 operation panel. X The sewing machine help screen appears. Press , , and (arrow keys) until 3 the image illustrating desired topic is selected. 1 2 Note ● For details on each topic, refer to the corresponding page in this Operation Manual. 3 4 1 Replacing the presser foot 2 Threading the upper thread 3 Winding the bobbin 4 Installing the bobbin Press (OK key). 4 X The first screen describing the procedure for the selected topic appears. To display the next screen, press . To 5 return to the previous screen, press . † Example: Upper threading APPENDIX INDEX Understanding the LCD Screens 13
-
 1
1 -
2
-
3
-
4
-
5
-
6
-
7
-
8
-
9
-
10
-
11
-
12
-
13
-
 14
14 -
 15
15 -
 16
16 -
 17
17 -
 18
18 -
 19
19 -
 20
20 -
 21
21 -
 22
22 -
 23
23 -
 24
24 -
25
-
26
-
27
-
28
-
29
-
30
-
31
-
32
-
33
-
34
-
35
-
36
-
37
-
38
-
39
-
40
-
41
-
42
-
43
-
44
-
45
-
46
-
47
-
48
-
49
-
50
-
51
-
52
-
53
-
54
-
55
-
56
-
57
-
58
-
59
-
60
-
61
-
62
-
63
-
64
-
65
-
66
-
67
-
68
-
69
-
70
-
71
-
72
-
73
-
74
-
75
-
76
-
77
-
78
-
79
-
80
-
81
-
82
-
83
-
84
-
85
-
86
-
87
-
88
-
89
-
90
-
91
-
92
-
93
-
94
-
95
-
96
-
97
-
98
-
99
-
100
-
101
-
102
-
103
-
104
-
105
-
106
-
107
-
108
-
109
-
110
-
111
-
112
-
113
-
114
-
115
-
116
-
117
-
118
-
119
-
120
-
121
-
122
-
123
-
124
-
125
-
126
-
127
-
128
-
129
-
130
-
131
-
132
-
133
-
134
-
135
-
136
-
137
-
138
-
139
-
140
-
141
-
142
-
143
-
144
-
145
-
146
-
147
-
148
-
149
-
150
-
151
-
152
-
153
 |
 |