Brother International NX-400 Users Manual - English - Page 27
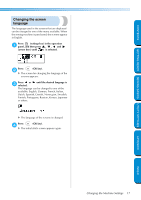
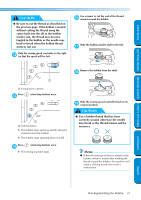
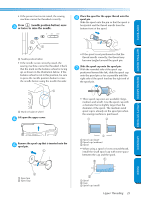
without cutting the thread using the, the previous If the bobbin is wound
 |
View all Brother International NX-400 manuals
Add to My Manuals
Save this manual to your list of manuals |
Page 27 highlights
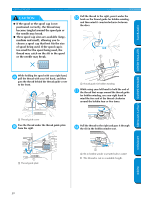
CONTENTS GETTING READY SEWING BASICS UTILITY STITCHES CAUTION ● Be sure to cut the thread as described on the previous page. If the bobbin is wound without cutting the thread using the cutter built into the slit in the bobbin winder seat, the thread may become tangled in the bobbin or the needle may bend or break when the bobbin thread starts to run out. Slide the sewing speed controller to the right c (so that the speed will be fast). Use scissors to cut the end of the thread f wound around the bobbin. Slide the bobbin winder shaft to the left. g Remove the bobbin from the shaft. h 1 1 Sewing speed controller Press d (start/stop button) once. 1 1 Start/stop button X The bobbin starts spinning and the thread is wound around the bobbin. X The bobbin stops spinning when it is full. Press e (start/stop button) once. X The sewing machine stops. Slide the sewing speed controller back to its i original position. CAUTION ● Use a bobbin thread that has been correctly wound, otherwise the needle may break or the thread tension will be incorrect. Memo ● When the sewing machine is started or the balance wheel is turned after winding the thread around the bobbin, the machine will make a clicking sound; this is not a malfunction. APPENDIX INDEX Winding/Installing the Bobbin 21
-
 1
1 -
2
-
3
-
4
-
5
-
6
-
7
-
8
-
9
-
10
-
11
-
12
-
13
-
14
-
15
-
16
-
17
-
18
-
19
-
20
-
21
-
 22
22 -
 23
23 -
 24
24 -
 25
25 -
 26
26 -
 27
27 -
 28
28 -
 29
29 -
 30
30 -
 31
31 -
 32
32 -
33
-
34
-
35
-
36
-
37
-
38
-
39
-
40
-
41
-
42
-
43
-
44
-
45
-
46
-
47
-
48
-
49
-
50
-
51
-
52
-
53
-
54
-
55
-
56
-
57
-
58
-
59
-
60
-
61
-
62
-
63
-
64
-
65
-
66
-
67
-
68
-
69
-
70
-
71
-
72
-
73
-
74
-
75
-
76
-
77
-
78
-
79
-
80
-
81
-
82
-
83
-
84
-
85
-
86
-
87
-
88
-
89
-
90
-
91
-
92
-
93
-
94
-
95
-
96
-
97
-
98
-
99
-
100
-
101
-
102
-
103
-
104
-
105
-
106
-
107
-
108
-
109
-
110
-
111
-
112
-
113
-
114
-
115
-
116
-
117
-
118
-
119
-
120
-
121
-
122
-
123
-
124
-
125
-
126
-
127
-
128
-
129
-
130
-
131
-
132
-
133
-
134
-
135
-
136
-
137
-
138
-
139
-
140
-
141
-
142
-
143
-
144
-
145
-
146
-
147
-
148
-
149
-
150
-
151
-
152
-
153
 |
 |