Brother International NX-400 Users Manual - English - Page 6
Operation panel - sewing machines
 |
View all Brother International NX-400 manuals
Add to My Manuals
Save this manual to your list of manuals |
Page 6 highlights
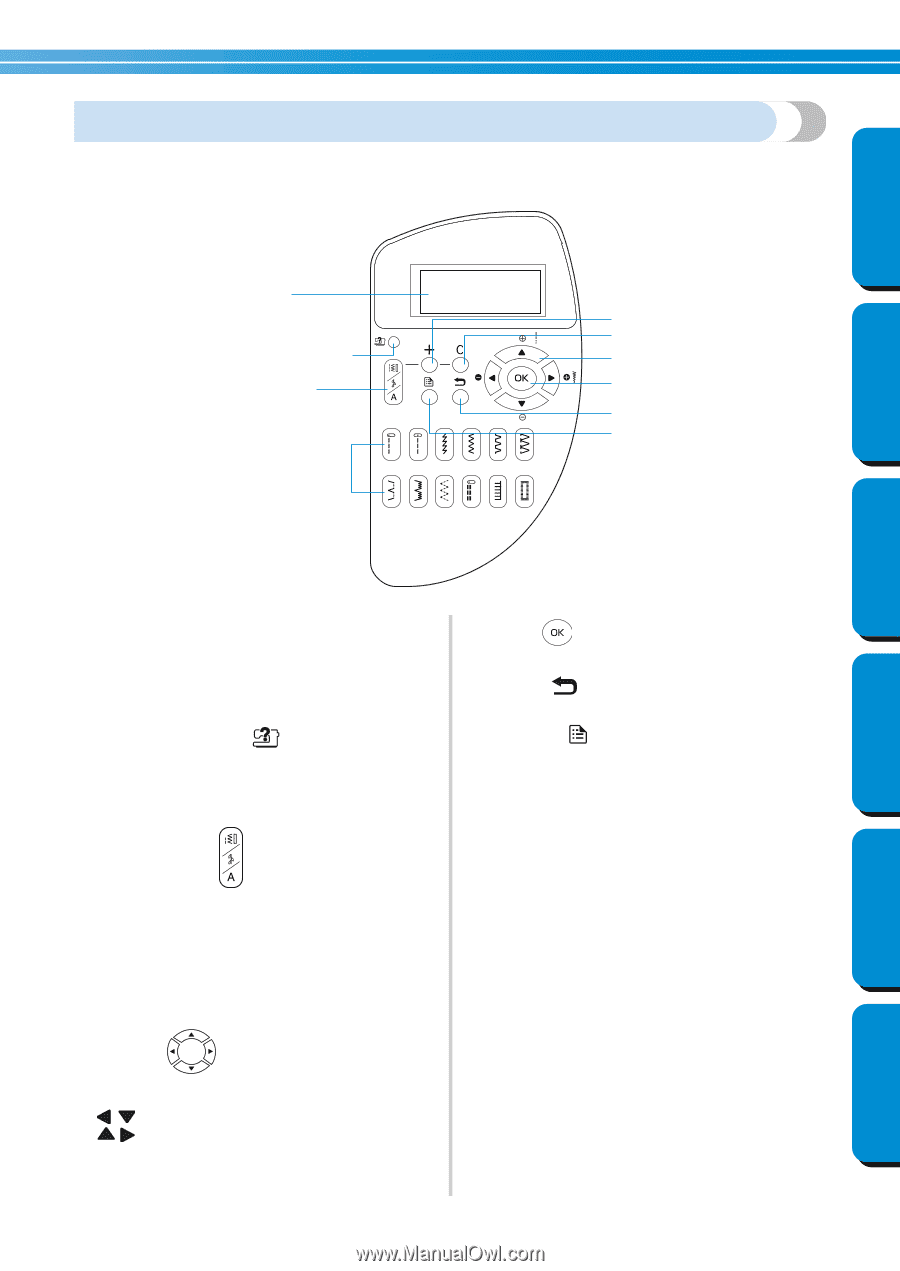
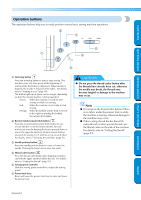
CONTENTS Operation panel The operation panel, located on the front at the right of the sewing machine, consists of the LCD (liquid crystal display) and keys for specifying various sewing settings. 1 4 5 2 6 3 7 8 9 0 GETTING READY SEWING BASICS UTILITY STITCHES APPENDIX 1 LCD (liquid crystal display) Settings for the selected stitch and error messages for incorrect operations appear in the LCD. Use keys 2 through 9, described below, to display various items and select the settings. For details, refer to "Understanding the LCD Screens" (page 12). 2 Sewing machine help key Press this key to display operation information. Simple descriptions on threading the upper thread, installing the bobbin, winding the bobbin and replacing the presser foot can be displayed. 3 Stitch selection key Press this key to select the desired type of stitch. 4 + key Press this key to add a pattern when sewing combinations of characters or decorative stitches. 5 C key Press this key to remove an added pattern when sewing combinations of characters or decorative stitches. 6 Arrow keys Use these keys to move in the indicated direction when selecting an item displayed on the screen. In addition, can be pressed to select a lower setting and can be pressed to select a higher setting. 7 OK key Press this key to apply the selected item. 8 Back key Press this key to return to the previous screen. 9 Settings key Press this key to select sewing settings, such as for automatic reverse/reinforcement stitching, or other settings such as the operation beep. 0 Stitch keys Use these keys to quickly select one of 12 of the most often used stitches. For details, refer to "Selecting stitching" (page 68). Cover E INDEX
-
 1
1 -
 2
2 -
 3
3 -
 4
4 -
 5
5 -
 6
6 -
 7
7 -
 8
8 -
 9
9 -
 10
10 -
 11
11 -
 12
12 -
13
-
14
-
15
-
16
-
17
-
18
-
19
-
20
-
21
-
22
-
23
-
24
-
25
-
26
-
27
-
28
-
29
-
30
-
31
-
32
-
33
-
34
-
35
-
36
-
37
-
38
-
39
-
40
-
41
-
42
-
43
-
44
-
45
-
46
-
47
-
48
-
49
-
50
-
51
-
52
-
53
-
54
-
55
-
56
-
57
-
58
-
59
-
60
-
61
-
62
-
63
-
64
-
65
-
66
-
67
-
68
-
69
-
70
-
71
-
72
-
73
-
74
-
75
-
76
-
77
-
78
-
79
-
80
-
81
-
82
-
83
-
84
-
85
-
86
-
87
-
88
-
89
-
90
-
91
-
92
-
93
-
94
-
95
-
96
-
97
-
98
-
99
-
100
-
101
-
102
-
103
-
104
-
105
-
106
-
107
-
108
-
109
-
110
-
111
-
112
-
113
-
114
-
115
-
116
-
117
-
118
-
119
-
120
-
121
-
122
-
123
-
124
-
125
-
126
-
127
-
128
-
129
-
130
-
131
-
132
-
133
-
134
-
135
-
136
-
137
-
138
-
139
-
140
-
141
-
142
-
143
-
144
-
145
-
146
-
147
-
148
-
149
-
150
-
151
-
152
-
153
 |
 |