Brother International NX-400 Users Manual - English - Page 8
Introduction, Sewing Machine Features - sewing machine manual
 |
View all Brother International NX-400 manuals
Add to My Manuals
Save this manual to your list of manuals |
Page 8 highlights
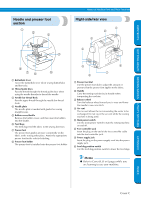
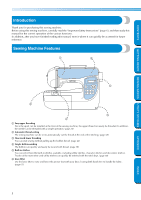
CONTENTS GETTING READY SEWING BASICS UTILITY STITCHES Introduction Thank you for purchasing this sewing machine. Before using this sewing machine, carefully read the "Important Safety Instructions" (page 6), and then study this manual for the correct operation of the various functions. In addition, after you have finished reading this manual, store it where it can quickly be accessed for future reference. Sewing Machine Features 1 4 5 2 6 3 1 Easy upper threading Since the spool can be installed at the front of the sewing machine, the upper thread can easily be threaded. In addition, the needle can be threaded with a simple operation. (page 24) 2 Automatic thread-cutting The sewing machine can be set to automatically cut the thread at the end of the stitching. (page 58) 3 One-touch lower threading You can start sewing without pulling up the bobbin thread. (page 22) 4 Simple bobbin-winding The bobbin can quickly and easily be wound with thread. (page 18) 5 Built-in stitches You can select from the built-in stitches available, including utility stitches, character stitches and decorative stitches. Twelve of the most often used utility stitches can quickly be selected with the stitch keys. (page 68) 6 Knee lifter Use the knee lifter to raise and lower the presser foot with your knee, leaving both hands free to handle the fabric. (page 61) APPENDIX INDEX 2
-
 1
1 -
2
-
 3
3 -
 4
4 -
 5
5 -
 6
6 -
 7
7 -
 8
8 -
 9
9 -
 10
10 -
 11
11 -
 12
12 -
 13
13 -
14
-
15
-
16
-
17
-
18
-
19
-
20
-
21
-
22
-
23
-
24
-
25
-
26
-
27
-
28
-
29
-
30
-
31
-
32
-
33
-
34
-
35
-
36
-
37
-
38
-
39
-
40
-
41
-
42
-
43
-
44
-
45
-
46
-
47
-
48
-
49
-
50
-
51
-
52
-
53
-
54
-
55
-
56
-
57
-
58
-
59
-
60
-
61
-
62
-
63
-
64
-
65
-
66
-
67
-
68
-
69
-
70
-
71
-
72
-
73
-
74
-
75
-
76
-
77
-
78
-
79
-
80
-
81
-
82
-
83
-
84
-
85
-
86
-
87
-
88
-
89
-
90
-
91
-
92
-
93
-
94
-
95
-
96
-
97
-
98
-
99
-
100
-
101
-
102
-
103
-
104
-
105
-
106
-
107
-
108
-
109
-
110
-
111
-
112
-
113
-
114
-
115
-
116
-
117
-
118
-
119
-
120
-
121
-
122
-
123
-
124
-
125
-
126
-
127
-
128
-
129
-
130
-
131
-
132
-
133
-
134
-
135
-
136
-
137
-
138
-
139
-
140
-
141
-
142
-
143
-
144
-
145
-
146
-
147
-
148
-
149
-
150
-
151
-
152
-
153
 |
 |