Brother International PE-DESIGN Ver.4 3 2 Instructin Manual for PE-DESIGN Ver. - Page 127
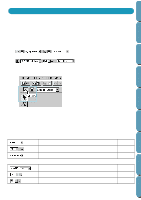
Click point 2 and next points referring to the illustration below.
 |
View all Brother International PE-DESIGN Ver.4 3 2 manuals
Add to My Manuals
Save this manual to your list of manuals |
Page 127 highlights
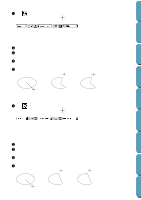
Contents Before Using Getting Started Design Center with a block-type pattern, then switch to a running-type pattern (to draw an outline of the blocktype pattern) then switch to the feed type to move to the beginning of the next block-type pattern. The whole pattern, consisting of different types, will be considered a single object (all parts will have the same stitch and color). In the example below, we start with a block-type pattern, use the feed type to move the cursor, then create a run-type pattern. 3 Click to start creating a block-type pattern. The shape of the cursor changes to and displays together with a small image of the block- type button. The Sewing Attributes bar now looks like this: You can select the color and stitch at this step or after creating the pattern. See "Color" on page 127 and "Stitch" on page 129. You can also set the sewing attributes using the Sew menu (see "Sewing Attribute Setting" on page 159). 4 Click point 1 on the Design Page (start point). Click point 2 and next points referring to the illustration below. 8 7 5 9 11 6 12 10 13 8 7 5 11 6 12 9 Step pitch 10 13 4 3 4 3 1 2 1 2 Note that you can always click the mouse's right button to remove the last entered point. 5 After clicking at point 8 (the last point of the above block-type pattern), click tern button), then click at point 9 (the start point of the running-type pattern). (feed-type pat- 6 Click (running-type pattern button) and click at points 10, 11, and 12 shown in the above illustration. 7 When you reach point 13, (the last point of the entire pattern), double click to complete the pattern. Layout & Editing File Utility Programmable Stich Creator Quik Reference Alphabetic Index 118
-
 1
1 -
2
-
3
-
4
-
5
-
6
-
7
-
8
-
9
-
10
-
11
-
12
-
13
-
14
-
15
-
16
-
17
-
18
-
19
-
20
-
21
-
22
-
23
-
24
-
25
-
26
-
27
-
28
-
29
-
30
-
31
-
32
-
33
-
34
-
35
-
36
-
37
-
38
-
39
-
40
-
41
-
42
-
43
-
44
-
45
-
46
-
47
-
48
-
49
-
50
-
51
-
52
-
53
-
54
-
55
-
56
-
57
-
58
-
59
-
60
-
61
-
62
-
63
-
64
-
65
-
66
-
67
-
68
-
69
-
70
-
71
-
72
-
73
-
74
-
75
-
76
-
77
-
78
-
79
-
80
-
81
-
82
-
83
-
84
-
85
-
86
-
87
-
88
-
89
-
90
-
91
-
92
-
93
-
94
-
95
-
96
-
97
-
98
-
99
-
100
-
101
-
102
-
103
-
104
-
105
-
106
-
107
-
108
-
109
-
110
-
111
-
112
-
113
-
114
-
115
-
116
-
117
-
118
-
119
-
120
-
121
-
 122
122 -
 123
123 -
 124
124 -
 125
125 -
 126
126 -
 127
127 -
 128
128 -
 129
129 -
 130
130 -
 131
131 -
 132
132 -
133
-
134
-
135
-
136
-
137
-
138
-
139
-
140
-
141
-
142
-
143
-
144
-
145
-
146
-
147
-
148
-
149
-
150
-
151
-
152
-
153
-
154
-
155
-
156
-
157
-
158
-
159
-
160
-
161
-
162
-
163
-
164
-
165
-
166
-
167
-
168
-
169
-
170
-
171
-
172
-
173
-
174
-
175
-
176
-
177
-
178
-
179
-
180
-
181
-
182
-
183
-
184
-
185
-
186
-
187
-
188
-
189
-
190
-
191
-
192
-
193
-
194
-
195
-
196
-
197
-
198
-
199
-
200
-
201
-
202
-
203
-
204
-
205
-
206
-
207
-
208
-
209
-
210
-
211
-
212
-
213
-
214
-
215
-
216
-
217
-
218
-
219
-
220
-
221
-
222
-
223
-
224
 |
 |
