Brother International PE-DESIGN Ver.4 3 2 Instructin Manual for PE-DESIGN Ver. - Page 60
Check the data, Optimize hoop change, Option, Design Property, Display, Preview
 |
View all Brother International PE-DESIGN Ver.4 3 2 manuals
Add to My Manuals
Save this manual to your list of manuals |
Page 60 highlights
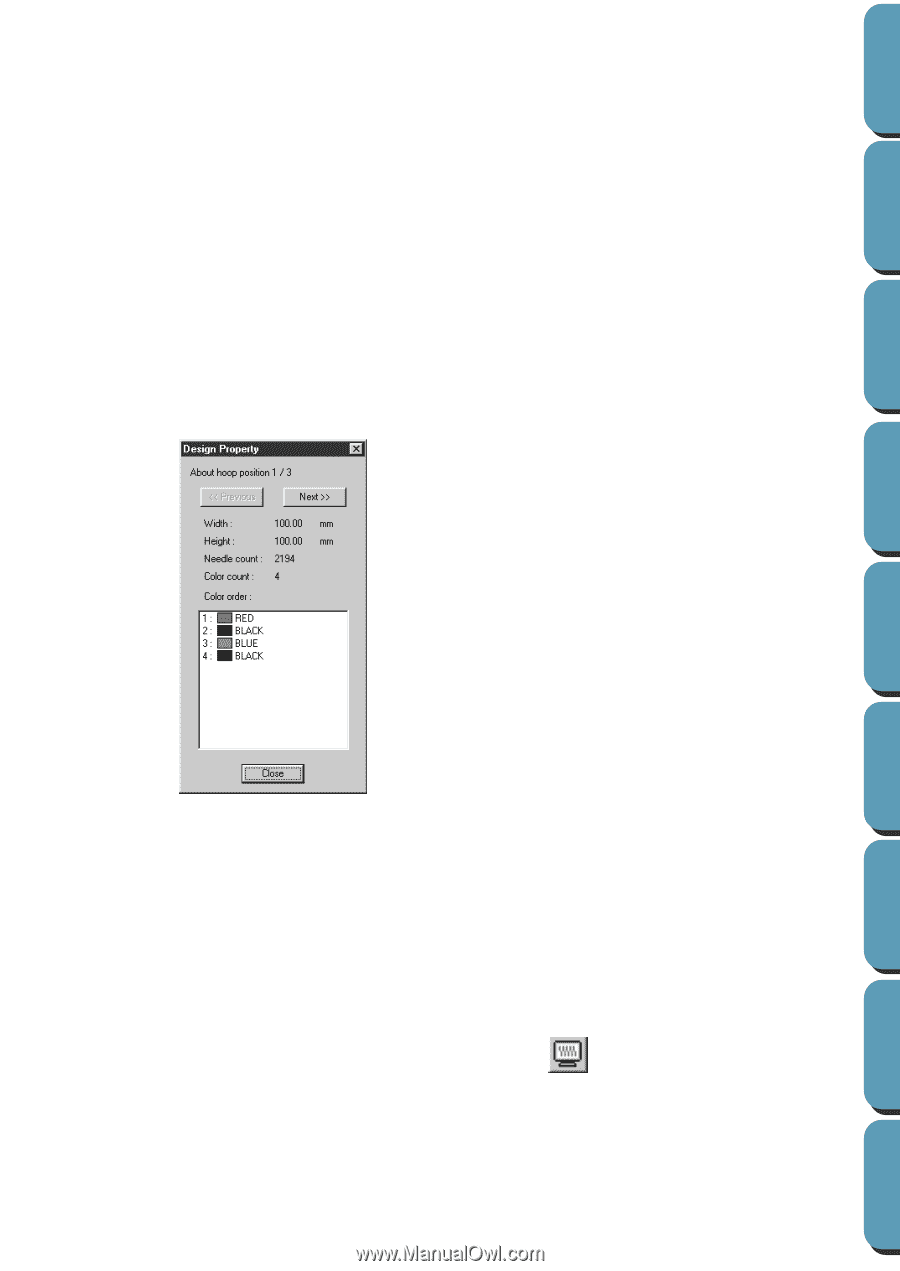
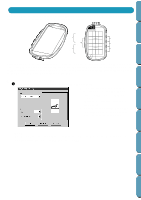
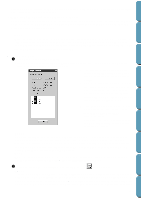
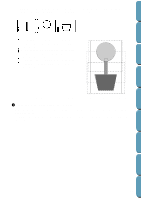
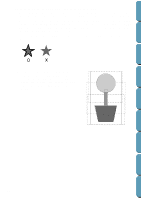
Contents The sewing order that you have set is optimized to reduce the number of times that the embroidery frame installation position is changed. • When the Optimize hoop change setting is turned off: Each pattern is sewn according to the sewing order that you have set. Therefore, since the number of times for changing the embroidery frame installation position is not optimized, it may be changed more often than if it was optimized. Before Using Getting Started Design Center NOTE: Since the pattern may not be sewn correctly or the fabric may not feed evenly if the embroidery frame installation position is changed too often, we recommend turning on the Optimize hoop change setting. Since turning on this setting will change the sewing order that you have set, check the sewing order before you begin embroidering. s Check the data 1 Click Option, then Design Property. At the same time that the Design Property dialog appears, the Design Page is automatically enlarged or shrunk to fit in the entire window. x The first line of the dialog shows the position in the embroidery frame installation order for the currently displayed design. • Only the designs that would be sewn at the current position in the embroidery frame installation order appear in the Design Page. In addition, the embroidering area for the current frame installation position is outlined in red. x Click Previous or Next to display information for the designs at other positions in the embroidery frame installation order. • At this time, the corresponding pattern and embroidery frame position appear in the Design Page. Layout & Editing File Utility Programmable Stich Creator Quik Reference Alphabetic Index NOTE: If an object is larger than the embroidering area or if an object is positioned so that it does not completely fit within an embroidering area, the error message "Please change the object size or position." is displayed instead of this dialog. After the object causing the error appears selected, change its size or position. (If more than one object causes the error message to appear, the objects will appear selected in the sewing order.) NOTE: Make sure that no pattern has been selected before clicking this command. If a pattern has been already been selected, only the information for that pattern is displayed. 2 To preview the image, click Display, then Preview or click on the Toolbar. NOTE: Just like for the command Option - Design Property, if an object is larger than the embroidering area or if an object is positioned so that it does not completely fit within an embroidering area, the error message "Please change the object size or position." is displayed instead of displaying a preview of the image. After the object causing the error appears selected, change its size or position. 51
-
 1
1 -
2
-
3
-
4
-
5
-
6
-
7
-
8
-
9
-
10
-
11
-
12
-
13
-
14
-
15
-
16
-
17
-
18
-
19
-
20
-
21
-
22
-
23
-
24
-
25
-
26
-
27
-
28
-
29
-
30
-
31
-
32
-
33
-
34
-
35
-
36
-
37
-
38
-
39
-
40
-
41
-
42
-
43
-
44
-
45
-
46
-
47
-
48
-
49
-
50
-
51
-
52
-
53
-
54
-
 55
55 -
 56
56 -
 57
57 -
 58
58 -
 59
59 -
 60
60 -
 61
61 -
 62
62 -
 63
63 -
 64
64 -
 65
65 -
66
-
67
-
68
-
69
-
70
-
71
-
72
-
73
-
74
-
75
-
76
-
77
-
78
-
79
-
80
-
81
-
82
-
83
-
84
-
85
-
86
-
87
-
88
-
89
-
90
-
91
-
92
-
93
-
94
-
95
-
96
-
97
-
98
-
99
-
100
-
101
-
102
-
103
-
104
-
105
-
106
-
107
-
108
-
109
-
110
-
111
-
112
-
113
-
114
-
115
-
116
-
117
-
118
-
119
-
120
-
121
-
122
-
123
-
124
-
125
-
126
-
127
-
128
-
129
-
130
-
131
-
132
-
133
-
134
-
135
-
136
-
137
-
138
-
139
-
140
-
141
-
142
-
143
-
144
-
145
-
146
-
147
-
148
-
149
-
150
-
151
-
152
-
153
-
154
-
155
-
156
-
157
-
158
-
159
-
160
-
161
-
162
-
163
-
164
-
165
-
166
-
167
-
168
-
169
-
170
-
171
-
172
-
173
-
174
-
175
-
176
-
177
-
178
-
179
-
180
-
181
-
182
-
183
-
184
-
185
-
186
-
187
-
188
-
189
-
190
-
191
-
192
-
193
-
194
-
195
-
196
-
197
-
198
-
199
-
200
-
201
-
202
-
203
-
204
-
205
-
206
-
207
-
208
-
209
-
210
-
211
-
212
-
213
-
214
-
215
-
216
-
217
-
218
-
219
-
220
-
221
-
222
-
223
-
224
 |
 |