Brother International PE-DESIGN Ver.4 3 2 Instructin Manual for PE-DESIGN Ver. - Page 62
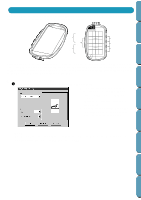
frame is installed at the bottom installation, position position c.
 |
View all Brother International PE-DESIGN Ver.4 3 2 manuals
Add to My Manuals
Save this manual to your list of manuals |
Page 62 highlights
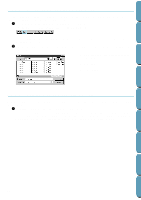
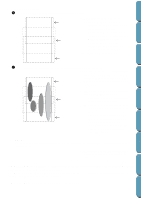
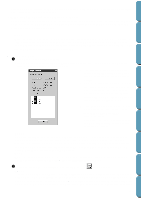
Contents Before Using Getting Started Design Center Layout & Editing If the pattern shown below at the right is written to an original card and the written pattern is checked on the embroidering machine, it will appears as follows. : This pattern is sewn when the embroidery frame is installed at the top installation position (position a). : This pattern is sewn when the embroidery frame is installed at the middle installation position (position b). : This pattern is sewn when the embroidery frame is installed at the bottom installation position (position c). Therefore, the frame installation position sewing order for the pattern shown above is b, a, then c. 2 Writing data to an original card using File Utility. When writing data to a card using File Utility, all of the data is written at the same time, like 1 explained above. However, the difference is that if there is space on the card, other patterns can also be written to the card. 53 File Utility Programmable Stich Creator Quik Reference Alphabetic Index
-
 1
1 -
2
-
3
-
4
-
5
-
6
-
7
-
8
-
9
-
10
-
11
-
12
-
13
-
14
-
15
-
16
-
17
-
18
-
19
-
20
-
21
-
22
-
23
-
24
-
25
-
26
-
27
-
28
-
29
-
30
-
31
-
32
-
33
-
34
-
35
-
36
-
37
-
38
-
39
-
40
-
41
-
42
-
43
-
44
-
45
-
46
-
47
-
48
-
49
-
50
-
51
-
52
-
53
-
54
-
55
-
56
-
 57
57 -
 58
58 -
 59
59 -
 60
60 -
 61
61 -
 62
62 -
 63
63 -
 64
64 -
 65
65 -
 66
66 -
 67
67 -
68
-
69
-
70
-
71
-
72
-
73
-
74
-
75
-
76
-
77
-
78
-
79
-
80
-
81
-
82
-
83
-
84
-
85
-
86
-
87
-
88
-
89
-
90
-
91
-
92
-
93
-
94
-
95
-
96
-
97
-
98
-
99
-
100
-
101
-
102
-
103
-
104
-
105
-
106
-
107
-
108
-
109
-
110
-
111
-
112
-
113
-
114
-
115
-
116
-
117
-
118
-
119
-
120
-
121
-
122
-
123
-
124
-
125
-
126
-
127
-
128
-
129
-
130
-
131
-
132
-
133
-
134
-
135
-
136
-
137
-
138
-
139
-
140
-
141
-
142
-
143
-
144
-
145
-
146
-
147
-
148
-
149
-
150
-
151
-
152
-
153
-
154
-
155
-
156
-
157
-
158
-
159
-
160
-
161
-
162
-
163
-
164
-
165
-
166
-
167
-
168
-
169
-
170
-
171
-
172
-
173
-
174
-
175
-
176
-
177
-
178
-
179
-
180
-
181
-
182
-
183
-
184
-
185
-
186
-
187
-
188
-
189
-
190
-
191
-
192
-
193
-
194
-
195
-
196
-
197
-
198
-
199
-
200
-
201
-
202
-
203
-
204
-
205
-
206
-
207
-
208
-
209
-
210
-
211
-
212
-
213
-
214
-
215
-
216
-
217
-
218
-
219
-
220
-
221
-
222
-
223
-
224
 |
 |
