Brother International PE-DESIGN Ver.4 3 2 Instructin Manual for PE-DESIGN Ver. - Page 132
Text size, Transform level, Text Input Mode on Point Edit Mode
 |
View all Brother International PE-DESIGN Ver.4 3 2 manuals
Add to My Manuals
Save this manual to your list of manuals |
Page 132 highlights
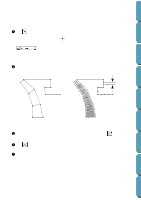
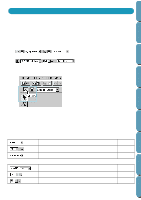
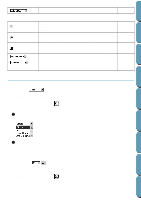
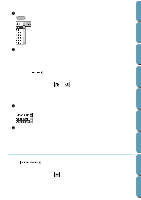
Contents Before Using Getting Started Design Center If one of these TrueType fonts are selected, the font data is automatically converted to embroidery data. Font settings can be changed in the TrueType Font Attribute Setting dialog, which is displayed by clicking Text - TrueType Font Attribute Setting. NOTE: Some TrueType fonts may not convert well into beautiful embroidery data due to their design and shape. See also: "Text Input Mode" on page 111, "Point Edit Mode" on page 106, "TrueType Font Attribute Setting" on page 158 s Text size Purpose: Selects the size for text. Available: When you click on the Tool Box to start the Text Input mode. When you select existing text patterns with the cursor in Selection mode. When you select characters with the cursor in Point Edit mode. Operation: 1 Type the desired value in the Text size selector (5 ~ 100 mm or 0.20 ~ 3.93 inches) and press the Enter key or click on the Text size selector to display the available values. 2 Click the desired value. The setting applies to all the text patterns that you will create in the Text Input mode until you change the setting. If a text pattern or characters of a text pattern are selected, the setting also applies to the selection. See also: "Text Input Mode" on page 111, "Point Edit Mode" on page 106 s Transform level Purpose: Available: Selects the level of transformation. When you select an existing transformed text with the cursor in Selection mode. Layout & Editing File Utility Programmable Stich Creator Quik Reference Alphabetic Index 123
-
 1
1 -
2
-
3
-
4
-
5
-
6
-
7
-
8
-
9
-
10
-
11
-
12
-
13
-
14
-
15
-
16
-
17
-
18
-
19
-
20
-
21
-
22
-
23
-
24
-
25
-
26
-
27
-
28
-
29
-
30
-
31
-
32
-
33
-
34
-
35
-
36
-
37
-
38
-
39
-
40
-
41
-
42
-
43
-
44
-
45
-
46
-
47
-
48
-
49
-
50
-
51
-
52
-
53
-
54
-
55
-
56
-
57
-
58
-
59
-
60
-
61
-
62
-
63
-
64
-
65
-
66
-
67
-
68
-
69
-
70
-
71
-
72
-
73
-
74
-
75
-
76
-
77
-
78
-
79
-
80
-
81
-
82
-
83
-
84
-
85
-
86
-
87
-
88
-
89
-
90
-
91
-
92
-
93
-
94
-
95
-
96
-
97
-
98
-
99
-
100
-
101
-
102
-
103
-
104
-
105
-
106
-
107
-
108
-
109
-
110
-
111
-
112
-
113
-
114
-
115
-
116
-
117
-
118
-
119
-
120
-
121
-
122
-
123
-
124
-
125
-
126
-
 127
127 -
 128
128 -
 129
129 -
 130
130 -
 131
131 -
 132
132 -
 133
133 -
 134
134 -
 135
135 -
 136
136 -
 137
137 -
138
-
139
-
140
-
141
-
142
-
143
-
144
-
145
-
146
-
147
-
148
-
149
-
150
-
151
-
152
-
153
-
154
-
155
-
156
-
157
-
158
-
159
-
160
-
161
-
162
-
163
-
164
-
165
-
166
-
167
-
168
-
169
-
170
-
171
-
172
-
173
-
174
-
175
-
176
-
177
-
178
-
179
-
180
-
181
-
182
-
183
-
184
-
185
-
186
-
187
-
188
-
189
-
190
-
191
-
192
-
193
-
194
-
195
-
196
-
197
-
198
-
199
-
200
-
201
-
202
-
203
-
204
-
205
-
206
-
207
-
208
-
209
-
210
-
211
-
212
-
213
-
214
-
215
-
216
-
217
-
218
-
219
-
220
-
221
-
222
-
223
-
224
 |
 |
