Brother International PE180D Users Manual - English - Page 18
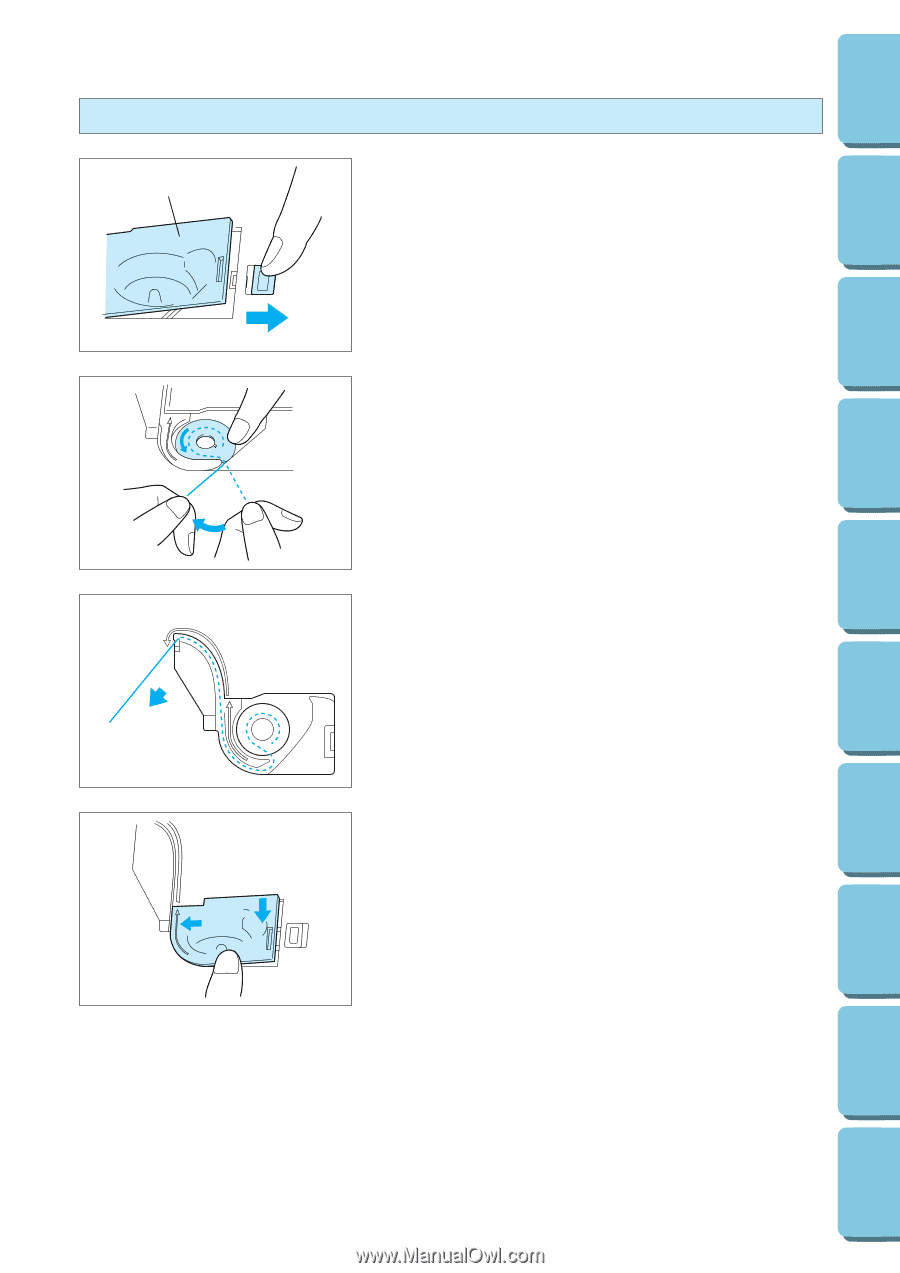
Setting the bobbin, direction as noted in the etching under the bobbin cover. - thread
 |
View all Brother International PE180D manuals
Add to My Manuals
Save this manual to your list of manuals |
Page 18 highlights
CONTENTS MACHINE KNOWLEDGE Setting the bobbin 1 2 The bobbin cover is located in front of the needle plate. 1. Slide open the bobbin cover by pushing the bobbin release button to the right. 1 Bobbin cover 2 Bobbin cover release button. 2. Insert the bobbin into the shuttle following the thread direction as noted in the etching under the bobbin cover. * (Use a plastic bobbin as shown on page 6) EMBROIDERING MAINTENANCE ERROR MESSAGE 3. Guide the thread end around the finger through the channel toward the back, pulling the thread toward you which will cut off any excess. TROUBLESHOOTING PATTERNS EMBROIDERING USING A SMALL FRAME (OPTIONAL) EMBROIDERING USING A EXTRA-SMALL FRAME (OPTIONAL) 12 4. Close the bobbin cover by placing the left end in place and pressing down lightly on the right end to snap in place. * There is no need to pull up the lower (bobbin) thread, it is done automatically. Embroidery can begin without pulling out the lower thread. 15 EMBROIDERING USING A LARGE FRAME (OPTIONAL)
-
 1
1 -
2
-
3
-
4
-
5
-
6
-
7
-
8
-
9
-
10
-
11
-
12
-
 13
13 -
 14
14 -
 15
15 -
 16
16 -
 17
17 -
 18
18 -
 19
19 -
 20
20 -
 21
21 -
 22
22 -
 23
23 -
24
-
25
-
26
-
27
-
28
-
29
-
30
-
31
-
32
-
33
-
34
-
35
-
36
-
37
-
38
-
39
-
40
-
41
-
42
-
43
-
44
-
45
-
46
-
47
-
48
-
49
-
50
-
51
-
52
-
53
-
54
-
55
-
56
-
57
-
58
-
59
-
60
-
61
-
62
-
63
-
64
-
65
-
66
-
67
-
68
-
69
-
70
-
71
-
72
-
73
-
74
-
75
-
76
-
77
-
78
-
79
-
80
-
81
-
82
-
83
-
84
-
85
-
86
-
87
-
88
-
89
-
90
-
91
-
92
-
93
-
94
-
95
-
96
-
97
-
98
-
99
-
100
-
101
-
102
-
103
-
104
-
105
-
106
-
107
-
108
-
109
-
110
-
111
-
112
-
113
-
114
-
115
-
116
-
117
-
118
-
119
-
120
-
121
-
122
-
123
-
124
-
125
-
126
-
127
-
128
-
129
-
130
-
131
-
132
-
133
-
134
-
135
-
136
-
137
-
138
-
139
-
140
-
141
-
142
-
143
-
144
-
145
-
146
-
147
 |
 |