Brother International PE180D Users Manual - English - Page 43
Selecting patterns from a memory card, IMPORTANT - cards
 |
View all Brother International PE180D manuals
Add to My Manuals
Save this manual to your list of manuals |
Page 43 highlights
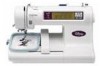
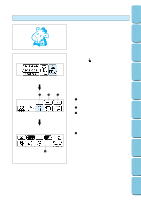
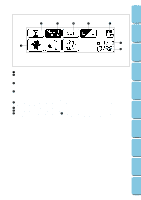
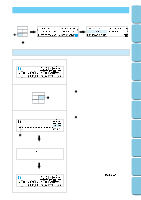
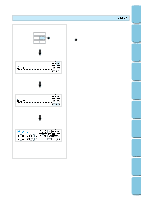
CONTENTS MACHINE KNOWLEDGE EMBROIDERING MAINTENANCE ERROR MESSAGE TROUBLESHOOTING Selecting patterns from a memory card Be sure to turn off the power switch before inserting or removing the memory cards. 1. Turn the power switch off. 2. Insert the memory card into the card slot according to the direction of the arrow mark on the memory card. 1 Direction arrow on memory card 3. Turn the power switch on. IMPORTANT * If the card is inserted in a direction other than that indicated by the arrow on the card, the connector in the card slot will become damaged. * Insert so that the card appears as shown in the illustration at left. If you try to push the card in any further, the connector will become damaged. * Be sure to turn the power switch off before removing the card. Pull the card straight out from the slot. * Always keep the memory cards in their proper case when they are not in use. 4. The pattern selection screen for the inserted memory card will be displayed. (The illustration shows the pattern selection screen for the No. 2 Flower card.) The selection process from this point is the same as for selecting built-in patterns. * If you use a selection key to display another screen, you can return to the above pattern selection screen by touching "CARD". 2 "CARD" key 40 PATTERNS EMBROIDERING USING A SMALL FRAME (OPTIONAL) EMBROIDERING USING A EXTRA-SMALL FRAME (OPTIONAL) EMBROIDERING USING A LARGE FRAME (OPTIONAL)
-
 1
1 -
2
-
3
-
4
-
5
-
6
-
7
-
8
-
9
-
10
-
11
-
12
-
13
-
14
-
15
-
16
-
17
-
18
-
19
-
20
-
21
-
22
-
23
-
24
-
25
-
26
-
27
-
28
-
29
-
30
-
31
-
32
-
33
-
34
-
35
-
36
-
37
-
 38
38 -
 39
39 -
 40
40 -
 41
41 -
 42
42 -
 43
43 -
 44
44 -
 45
45 -
 46
46 -
 47
47 -
 48
48 -
49
-
50
-
51
-
52
-
53
-
54
-
55
-
56
-
57
-
58
-
59
-
60
-
61
-
62
-
63
-
64
-
65
-
66
-
67
-
68
-
69
-
70
-
71
-
72
-
73
-
74
-
75
-
76
-
77
-
78
-
79
-
80
-
81
-
82
-
83
-
84
-
85
-
86
-
87
-
88
-
89
-
90
-
91
-
92
-
93
-
94
-
95
-
96
-
97
-
98
-
99
-
100
-
101
-
102
-
103
-
104
-
105
-
106
-
107
-
108
-
109
-
110
-
111
-
112
-
113
-
114
-
115
-
116
-
117
-
118
-
119
-
120
-
121
-
122
-
123
-
124
-
125
-
126
-
127
-
128
-
129
-
130
-
131
-
132
-
133
-
134
-
135
-
136
-
137
-
138
-
139
-
140
-
141
-
142
-
143
-
144
-
145
-
146
-
147
 |
 |