Brother International PE180D Users Manual - English - Page 20
Auto needle threading device, Needle threader lever - how to thread
 |
View all Brother International PE180D manuals
Add to My Manuals
Save this manual to your list of manuals |
Page 20 highlights
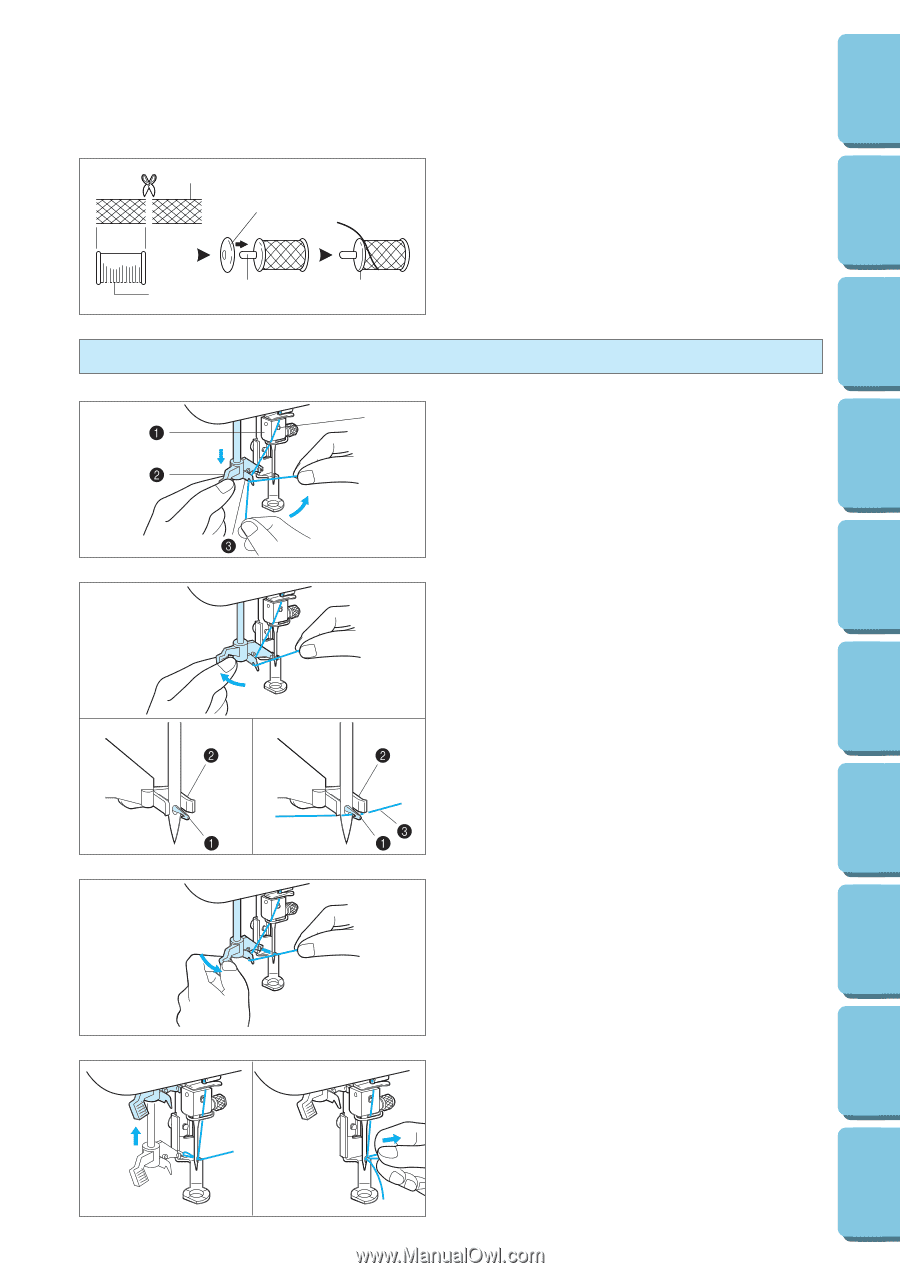
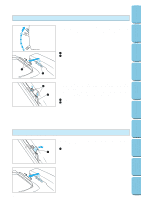
CONTENTS MACHINE KNOWLEDGE EMBROIDERING MAINTENANCE 1 4 2 3 4 Auto needle threading device 6 Net If using special threads which wind quickly off the thread spool, attach a net to the spool before using. * Cut the net to match the size of the spool. 1 Net 2 Thread spool 3 Spool pin 4 Spool cap 1. Guide the thread through the wire loop thread guide (number "6") and gently pull the thread towards you. 2. Lower the presser foot. 3. Lower the needle threader lever until it stops. Hook the thread into the guide and pull it across to the right. 1 Wire loop thread guide 2 Needle threader lever 3 Guide * The needle threading device cannot be used while the needle is lowered. 4. Push the needle threader lever toward the back. Check to be sure that the hook has passed through the eye of the needle and route the thread under the metal guides and the hook. * Pull the thread toward you and check that it is being held by the thread hook. 1 Hook 2 Metal guides 3 Thread correctly under the metal guides and the hook. 5. While gently holding the thread, pull the needle threader lever forward. ERROR MESSAGE TROUBLESHOOTING PATTERNS EMBROIDERING USING A SMALL FRAME (OPTIONAL) EMBROIDERING USING A EXTRA-SMALL FRAME (OPTIONAL) EMBROIDERING USING A LARGE FRAME (OPTIONAL) 6. Release the thread from the needle threader lever. 7. Pull the upper thread through the needle eye toward the rear of the machine. 17
-
 1
1 -
2
-
3
-
4
-
5
-
6
-
7
-
8
-
9
-
10
-
11
-
12
-
13
-
14
-
 15
15 -
 16
16 -
 17
17 -
 18
18 -
 19
19 -
 20
20 -
 21
21 -
 22
22 -
 23
23 -
 24
24 -
 25
25 -
26
-
27
-
28
-
29
-
30
-
31
-
32
-
33
-
34
-
35
-
36
-
37
-
38
-
39
-
40
-
41
-
42
-
43
-
44
-
45
-
46
-
47
-
48
-
49
-
50
-
51
-
52
-
53
-
54
-
55
-
56
-
57
-
58
-
59
-
60
-
61
-
62
-
63
-
64
-
65
-
66
-
67
-
68
-
69
-
70
-
71
-
72
-
73
-
74
-
75
-
76
-
77
-
78
-
79
-
80
-
81
-
82
-
83
-
84
-
85
-
86
-
87
-
88
-
89
-
90
-
91
-
92
-
93
-
94
-
95
-
96
-
97
-
98
-
99
-
100
-
101
-
102
-
103
-
104
-
105
-
106
-
107
-
108
-
109
-
110
-
111
-
112
-
113
-
114
-
115
-
116
-
117
-
118
-
119
-
120
-
121
-
122
-
123
-
124
-
125
-
126
-
127
-
128
-
129
-
130
-
131
-
132
-
133
-
134
-
135
-
136
-
137
-
138
-
139
-
140
-
141
-
142
-
143
-
144
-
145
-
146
-
147
 |
 |