Brother International PE180D Users Manual - English - Page 21
PREPARATION BEFORE EMBROIDERING, Attaching stabilizer material, Embroidering different types of fabric - embroidery machine
 |
View all Brother International PE180D manuals
Add to My Manuals
Save this manual to your list of manuals |
Page 21 highlights
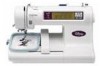
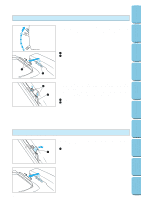
CONTENTS MACHINE KNOWLEDGE EMBROIDERING MAINTENANCE ERROR MESSAGE TROUBLESHOOTING PREPARATION BEFORE EMBROIDERING Be sure to turn off the power before carrying out the following. 1 1 "BASIC OPERATION" key Attaching stabilizer material Attach a stabilizer material to the reverse side of the area of fabric to be embroidered. It is not necessary to attach a stabilizer material to fabric which is already sufficiently stiff. For thin, knit and stretch fabric which may move in the frame, attach the fabric to a non-woven stabilizer material before embroidering. The stabilizer material should be framed along with the fabric for the best results. There are many types of non-woven stabilizers available on the market. The goal of the stabilizer is to prevent stretch or movement of the fabric. Best results for stretch, knit or light weight fabrics will be obtained by using a light weight nonwoven iron-on stabilizer. 1 Embroidery frame 2 Fabric 3 Non-woven stabilizer material Embroidering different types of fabric From normal fabrics to thick fabrics It's a good idea to place a piece of stabilizer fabric under (not within) the frame holding the fabric being embroidered. 18 PATTERNS EMBROIDERING USING A SMALL FRAME (OPTIONAL) EMBROIDERING USING A EXTRA-SMALL FRAME (OPTIONAL) EMBROIDERING USING A LARGE FRAME (OPTIONAL)
-
 1
1 -
2
-
3
-
4
-
5
-
6
-
7
-
8
-
9
-
10
-
11
-
12
-
13
-
14
-
15
-
 16
16 -
 17
17 -
 18
18 -
 19
19 -
 20
20 -
 21
21 -
 22
22 -
 23
23 -
 24
24 -
 25
25 -
 26
26 -
27
-
28
-
29
-
30
-
31
-
32
-
33
-
34
-
35
-
36
-
37
-
38
-
39
-
40
-
41
-
42
-
43
-
44
-
45
-
46
-
47
-
48
-
49
-
50
-
51
-
52
-
53
-
54
-
55
-
56
-
57
-
58
-
59
-
60
-
61
-
62
-
63
-
64
-
65
-
66
-
67
-
68
-
69
-
70
-
71
-
72
-
73
-
74
-
75
-
76
-
77
-
78
-
79
-
80
-
81
-
82
-
83
-
84
-
85
-
86
-
87
-
88
-
89
-
90
-
91
-
92
-
93
-
94
-
95
-
96
-
97
-
98
-
99
-
100
-
101
-
102
-
103
-
104
-
105
-
106
-
107
-
108
-
109
-
110
-
111
-
112
-
113
-
114
-
115
-
116
-
117
-
118
-
119
-
120
-
121
-
122
-
123
-
124
-
125
-
126
-
127
-
128
-
129
-
130
-
131
-
132
-
133
-
134
-
135
-
136
-
137
-
138
-
139
-
140
-
141
-
142
-
143
-
144
-
145
-
146
-
147
 |
 |