Brother International PE180D Users Manual - English - Page 53
Embroidering characters that extend beyond than one frame, Example: ABCDE in large size
 |
View all Brother International PE180D manuals
Add to My Manuals
Save this manual to your list of manuals |
Page 53 highlights
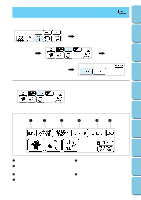
CONTENTS MACHINE KNOWLEDGE EMBROIDERING MAINTENANCE ERROR MESSAGE TROUBLESHOOTING Embroidering characters that extend beyond than one frame * This function is useful when there are many characters to embroider and you cannot embroider them all in the same frame. Example: ABCDE in large size 1. Input "ABC", then touch "SET" and then "LAYOUT". After this, touch "START/ CENTER" to switch to "START". 2. Press the "START/STOP" button to start embroidering. When embroidering has finished, the machine will sew the finishing position automatically. You can use the finishing position as the starting position for the characters to be embroidered next when the fabric is re-framed with the finishing point and last character just inside the left edge of the frame. 1 Finishing position 3. Input the remaining letters "DE", and then touch "START/CENTER" to select "START". 4. Touch the arrow keys to move the start point of the needle to the finishing position of the last character and then press the "START/STOP" button to start the machine. 1 Finishing position (Use it for the starting position of "DE".) Finished pattern 50 PATTERNS EMBROIDERING USING A SMALL FRAME (OPTIONAL) EMBROIDERING USING A EXTRA-SMALL FRAME (OPTIONAL) EMBROIDERING USING A LARGE FRAME (OPTIONAL)
-
 1
1 -
2
-
3
-
4
-
5
-
6
-
7
-
8
-
9
-
10
-
11
-
12
-
13
-
14
-
15
-
16
-
17
-
18
-
19
-
20
-
21
-
22
-
23
-
24
-
25
-
26
-
27
-
28
-
29
-
30
-
31
-
32
-
33
-
34
-
35
-
36
-
37
-
38
-
39
-
40
-
41
-
42
-
43
-
44
-
45
-
46
-
47
-
 48
48 -
 49
49 -
 50
50 -
 51
51 -
 52
52 -
 53
53 -
 54
54 -
 55
55 -
 56
56 -
 57
57 -
 58
58 -
59
-
60
-
61
-
62
-
63
-
64
-
65
-
66
-
67
-
68
-
69
-
70
-
71
-
72
-
73
-
74
-
75
-
76
-
77
-
78
-
79
-
80
-
81
-
82
-
83
-
84
-
85
-
86
-
87
-
88
-
89
-
90
-
91
-
92
-
93
-
94
-
95
-
96
-
97
-
98
-
99
-
100
-
101
-
102
-
103
-
104
-
105
-
106
-
107
-
108
-
109
-
110
-
111
-
112
-
113
-
114
-
115
-
116
-
117
-
118
-
119
-
120
-
121
-
122
-
123
-
124
-
125
-
126
-
127
-
128
-
129
-
130
-
131
-
132
-
133
-
134
-
135
-
136
-
137
-
138
-
139
-
140
-
141
-
142
-
143
-
144
-
145
-
146
-
147
 |
 |
