Brother International PE500 Users Manual - English - Page 49
Attaching the Embroidery Frame
 |
View all Brother International PE500 manuals
Add to My Manuals
Save this manual to your list of manuals |
Page 49 highlights
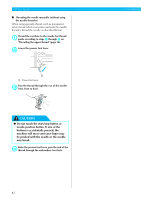
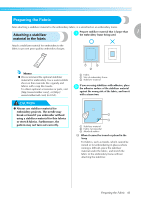
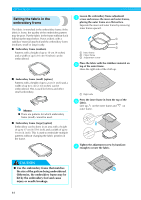
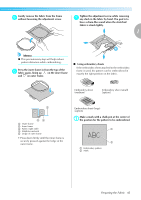
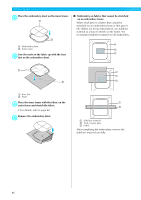
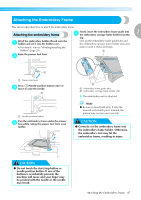
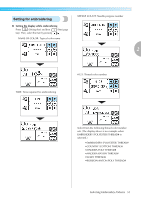
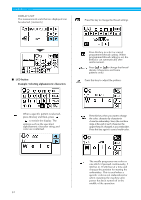
Attaching the Embroidery Frame This section describes how to attach the embroidery frame. Firmly insert the embroidery frame guide into 1 Attaching the embroidery frame e the embroidery carriage frame holder from the top. Wind the embroidery bobbin thread onto the a bobbin and set it into the bobbin case. Line up the embroidery frame guide tabs and the embroidery carriage frame holder slots and • For details, refer to "Winding/Installing the push in until it clicks and stops. Bobbin" (page 29). a Raise the presser foot lever. b a a Presser foot lever Press (Needle position button) once or c twice to raise the needle. a a Needle position button Pass the embroidery frame under the presser d foot while raising the presser foot lever even further. b a Embroidery frame guide tabs b Embroidery carriage frame holder slots X The embroidery unit is attached. Note z Be sure to insert both pins. If only the forward or the back pin is inserted, the pattern may not turn out correctly. CAUTION ● Correctly set the embroidery frame into the embroidery frame holder. Otherwise, the embroidery foot may hit the embroidery frame, resulting in injury. CAUTION ● Do not touch the start/stop button or needle position button. If one of the buttons is accidentally pressed, the machine will move and your finger may be pricked with the needle or the needle may break. Attaching the Embroidery Frame 47
-
 1
1 -
2
-
3
-
4
-
5
-
6
-
7
-
8
-
9
-
10
-
11
-
12
-
13
-
14
-
15
-
16
-
17
-
18
-
19
-
20
-
21
-
22
-
23
-
24
-
25
-
26
-
27
-
28
-
29
-
30
-
31
-
32
-
33
-
34
-
35
-
36
-
37
-
38
-
39
-
40
-
41
-
42
-
43
-
 44
44 -
 45
45 -
 46
46 -
 47
47 -
 48
48 -
 49
49 -
 50
50 -
 51
51 -
 52
52 -
 53
53 -
 54
54 -
55
-
56
-
57
-
58
-
59
-
60
-
61
-
62
-
63
-
64
-
65
-
66
-
67
-
68
-
69
-
70
-
71
-
72
-
73
-
74
-
75
-
76
-
77
-
78
-
79
-
80
-
81
-
82
-
83
-
84
-
85
-
86
-
87
-
88
-
89
-
90
-
91
-
92
 |
 |
