Brother International PE770 Users Manual - English - Page 34
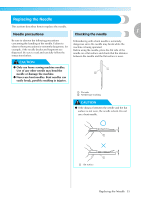
Threading the needle - sewing machine
 |
UPC - 012502623489
View all Brother International PE770 manuals
Add to My Manuals
Save this manual to your list of manuals |
Page 34 highlights
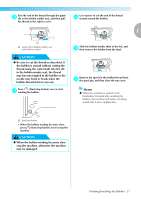
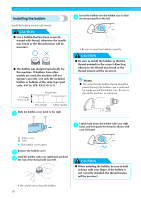
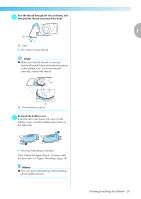
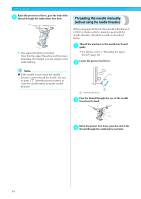
GETTING READY While using your right hand to lightly hold the j thread passed under the thread guide plate, pass the thread through the guides in the order shown below. 1 a Shutter Note z If the embroidery foot has been lowered and the shutter is closed, the machine cannot be threaded. Be sure to raise the embroidery foot and open the shutter before threading the machine. In addition, before removing the upper thread, be sure to raise the embroidery foot and open the shutter. z This machine is equipped with a window that allows you to check the position of the take-up lever. Look through this window and check that the thread is correctly fed through the take-up lever. Threading the needle This section describes how to thread the needle. Memo z The needle threader can be used with sewing machine needles 75/11 through 100/16. z Thread with a thickness of 130/20 or thicker cannot be used with the needle threader. z If the needle threader cannot be used, refer to "Threading the needle manually (without using the needle threader)" (page 34). Pull the end of the thread passed through the a needle bar thread guide to the left, and then pass the thread through the thread guide disk from the front. 1 a Thread guide disk Pass the thread behind the needle bar thread k guide. The thread can easily be passed behind the needle bar thread guide by holding the thread in your left hand, then feeding the thread with your right hand, as shown. 1 a Needle bar thread guide 32
-
 1
1 -
2
-
3
-
4
-
5
-
6
-
7
-
8
-
9
-
10
-
11
-
12
-
13
-
14
-
15
-
16
-
17
-
18
-
19
-
20
-
21
-
22
-
23
-
24
-
25
-
26
-
27
-
28
-
 29
29 -
 30
30 -
 31
31 -
 32
32 -
 33
33 -
 34
34 -
 35
35 -
 36
36 -
 37
37 -
 38
38 -
 39
39 -
40
-
41
-
42
-
43
-
44
-
45
-
46
-
47
-
48
-
49
-
50
-
51
-
52
-
53
-
54
-
55
-
56
-
57
-
58
-
59
-
60
-
61
-
62
-
63
-
64
-
65
-
66
-
67
-
68
-
69
-
70
-
71
-
72
-
73
-
74
-
75
-
76
-
77
-
78
-
79
-
80
-
81
-
82
-
83
-
84
-
85
-
86
-
87
-
88
 |
 |
