Brother International PE770 Users Manual - English - Page 45
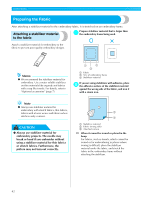
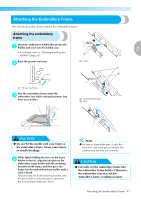
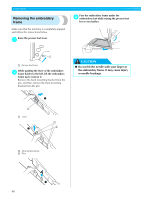
Setting the fabric in the, embroidery frame
 |
UPC - 012502623489
View all Brother International PE770 manuals
Add to My Manuals
Save this manual to your list of manuals |
Page 45 highlights
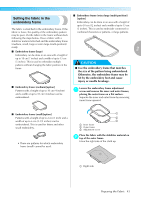
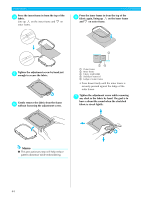
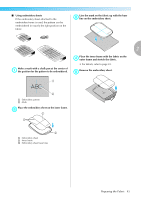
Setting the fabric in the ■ Embroidery frame (extra large (multi-position)) [option] embroidery frame Embroidery can be done in an area with a height of up to 30 cm (12 inches) and a width of up to 13 cm The fabric is stretched in the embroidery frame. If the fabric is loose, the quality of the embroidery pattern may be poor. Put the fabric in the frame without slack following the steps below. Have a fabric with a (5 inches). This is used to embroider connected or combined characters or patterns, or large patterns. stabilizer material attached and the embroidery frame (medium, small, large or extra large (multi-position)) ready. 2 ■ Embroidery frame (large) Embroidery can be done in an area with a height of up to 18 cm (7 inches) and a width of up to 13 cm (5 inches). This is used to embroider multiple patterns without changing the fabric position in the frame. CAUTION ● Use the embroidery frame that matches the size of the pattern being embroidered. Otherwise, the embroidery frame may be hit by the embroidery foot and cause injury or needle breakage. ■ Embroidery frame (medium)[option] Patterns with a height of up to 10 cm (4 inches) and a width of up to 10 cm (4 inches) can be embroidered. Loosen the embroidery frame adjustment a screw and remove the inner and outer frames, placing the outer frame on a flat surface. Separate the inner and outer frame by removing inner frame upward. ■ Embroidery frame (small)[option] Patterns with a height of up to 2 cm (1 inch) and a width of up to 6 cm (2-1/2 inches) can be embroidered. This is used for letters and other small embroidery. • There are patterns for which embroidery frame (small) cannot be used. 1 2 3 a Inner frame b Outer frame c Adjustment screw Place the fabric with the stabilizer material on b top of the outer frame. Have the right side of the cloth up. 1 a Right side Preparing the Fabric 43
-
 1
1 -
2
-
3
-
4
-
5
-
6
-
7
-
8
-
9
-
10
-
11
-
12
-
13
-
14
-
15
-
16
-
17
-
18
-
19
-
20
-
21
-
22
-
23
-
24
-
25
-
26
-
27
-
28
-
29
-
30
-
31
-
32
-
33
-
34
-
35
-
36
-
37
-
38
-
39
-
 40
40 -
 41
41 -
 42
42 -
 43
43 -
 44
44 -
 45
45 -
 46
46 -
 47
47 -
 48
48 -
 49
49 -
 50
50 -
51
-
52
-
53
-
54
-
55
-
56
-
57
-
58
-
59
-
60
-
61
-
62
-
63
-
64
-
65
-
66
-
67
-
68
-
69
-
70
-
71
-
72
-
73
-
74
-
75
-
76
-
77
-
78
-
79
-
80
-
81
-
82
-
83
-
84
-
85
-
86
-
87
-
88
 |
 |
