Brother International PS-2300 Users Manual - English - Page 53
Brother International PS-2300 Manual
 |
View all Brother International PS-2300 manuals
Add to My Manuals
Save this manual to your list of manuals |
Page 53 highlights
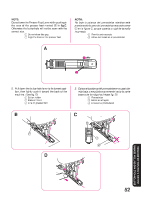
Patchwork Pattern (Link Stitch) SS Patchwork Modelo de puntada (Puntada de unión) 3-6 SS Stitch Length Stitch Width Largo de puntada Ancho de puntada 3-6 (Fagoting Stitch) (Puntada fagoting) These stitches are used to join two pieces of fabric while leaving a space between their edges. 1. Fold over the edges of the two pieces of fabric for the hem and baste the edges to a thin piece of paper leaving a small space between them. 2. Set the Pattern Selection Dial to Link Stitch or Fagoting Stitch. 3. Stitch along the edge, pulling both threads slightly when beginning to sew. • Use thicker than normal threads for sewing. 4. After sewing, remove the basting and the paper. Finish by tying knots on the reverse side at the beginning and the end of the seams. 1 First needle drop Estas puntadas sirven para juntar dos piezas de tejido dejando un espacio entre las dos orillas. 1. Doble las orillas de las dos piezas de tejido para el dobladillo e hilvánelas a un papel fino dejando un pequeño espacio entre ambas piezas. 2. Sitúe el selector de puntada en puntada de unión o puntada fagoting. 3. Cosa a lo largo de las orillas, tirando ligeramente de ambos hilos al comienzo. • Use hilos más gruesos de lo normal. 4. Después de coser, quite los hilvanes y el papel. Anude los cabos de los hilos del comienzo y final de la costura por el revés. 1 Primer pespunto de la aguja. PUNTADAS INCORPORADAS BUILT-IN STITCHES 1 1.5 mm 47
-
 1
1 -
2
-
3
-
4
-
5
-
6
-
7
-
8
-
9
-
10
-
11
-
12
-
13
-
14
-
15
-
16
-
17
-
18
-
19
-
20
-
21
-
22
-
23
-
24
-
25
-
26
-
27
-
28
-
29
-
30
-
31
-
32
-
33
-
34
-
35
-
36
-
37
-
38
-
39
-
40
-
41
-
42
-
43
-
44
-
45
-
46
-
47
-
 48
48 -
 49
49 -
 50
50 -
 51
51 -
 52
52 -
 53
53 -
 54
54 -
 55
55 -
 56
56 -
 57
57 -
 58
58 -
59
-
60
-
61
-
62
-
63
-
64
-
65
-
66
-
67
-
68
-
69
-
70
-
71
-
72
-
73
-
74
-
75
-
76
-
77
-
78
-
79
-
80
-
81
-
82
-
83
-
84
-
85
-
86
-
87
-
88
-
89
-
90
-
91
 |
 |
