Brother International PS-2300 Users Manual - English - Page 71
Brother International PS-2300 Manual
 |
View all Brother International PS-2300 manuals
Add to My Manuals
Save this manual to your list of manuals |
Page 71 highlights
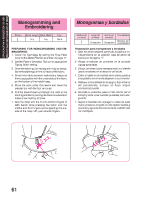
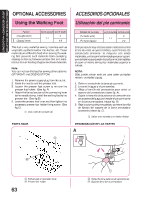
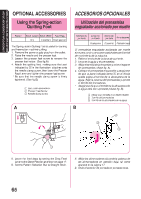
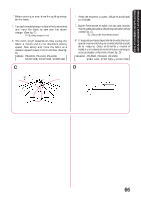
USING ATTACHMENTS AND APPLICATIONS USO DE ACCESORIOS Y APLICACIONES OPTIONAL ACCESSORIES Using the Spring-action Quilting Foot Pattern Stitch Length Stitch Width Any 0 (center) Feed Dog Down position ACCESORIOS OPCIONALES Utilización del prensatelas enguatador accionado por muelle Modelo de puntada Largo de puntada Ancho de puntada Alimentadores Cualquiera 0 (centro) Posición baja The Spring -action Quilting Foot is useful for darning and freemotion machine quilting. 1. Remove the power supply plug from the outlet. 2. Raise the needle and the presser foot. 3. Loosen the presser foot screw to remove the presser foot holder. (See fig.A) 4. Attach the quilting foot, making sure that part indicated by A in the illustration attaches onto the needle clamp screw, then lower the Presser Foot Lever and tighten the presser foot screw. * Be sure that the needle clamp screw is firmly tightened. (See fig.B) 1 Use a coin screwdriver. 2 Presser Foot Screw 3 Needle clamp screw El prensatelas enguatador accionado por muelle sirve para zurcir y para coser acolchados con libertad de movimiento de la máquina. 1. Retire el enchufe de la toma de corriente. 2. Levante la aguja y el prensatelas. 3. Afloje el tornillo del prensatelas y retire el soporte del prensatelas (véase fig. A). 4. Coloque el prensatelas enguatador y asegúrese de que la parte indicada como A en el dibujo queda sujeta al tornillo de la abrazadera de la aguja. Baje la palanca del prensatelas y apriete el tornillo del prensatelas. * Asegúrese de que el tornillo de la abrazadera de la aguja está bien apretado (véase fig. B). 1 Utilice una moneda o un destornillador 2 Tornillo del prensatelas 3 Tornillo de la abrazadera de la aguja A B A 2 3 1 5. Lower the feed dogs by setting the Drop Feed Lever to the Down Position as shown on page 17. 6. Set the Pattern Selection Dial to Straight Stitch. 5. Afloje los alimentadores situando la palanca de los alimentadores en posición baja, tal como aparece en la página 17. 6. Sitúe el selector de puntada en puntada recta. 65
-
 1
1 -
2
-
3
-
4
-
5
-
6
-
7
-
8
-
9
-
10
-
11
-
12
-
13
-
14
-
15
-
16
-
17
-
18
-
19
-
20
-
21
-
22
-
23
-
24
-
25
-
26
-
27
-
28
-
29
-
30
-
31
-
32
-
33
-
34
-
35
-
36
-
37
-
38
-
39
-
40
-
41
-
42
-
43
-
44
-
45
-
46
-
47
-
48
-
49
-
50
-
51
-
52
-
53
-
54
-
55
-
56
-
57
-
58
-
59
-
60
-
61
-
62
-
63
-
64
-
65
-
 66
66 -
 67
67 -
 68
68 -
 69
69 -
 70
70 -
 71
71 -
 72
72 -
 73
73 -
 74
74 -
 75
75 -
 76
76 -
77
-
78
-
79
-
80
-
81
-
82
-
83
-
84
-
85
-
86
-
87
-
88
-
89
-
90
-
91
 |
 |
