Brother International PS-2300 Users Manual - English - Page 54
Brother International PS-2300 Manual
 |
View all Brother International PS-2300 manuals
Add to My Manuals
Save this manual to your list of manuals |
Page 54 highlights
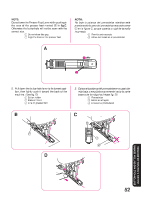
Overedge Stitching Pattern (Comb Stitch) (Slant Overlock Stitch) (Elastic Overlock Stitch) (Elastic Shell Tuck Stitch) F-3 SS Puntada por encima de la orilla Modelo de puntada (Puntada peine) (Puntada overlock estrecha) SS Stitch Length Stitch Width Largo de puntada Ancho de puntada 3-6 3-5 (Puntada overlock elástica) (Puntada ondas elástica) F-3 These stitches are used to join together seams and finish them in one operation. The Elastic Overlock Stitche is useful when sewing stretch materials. 1. Set the Pattern Selection Dial to Comb Stitch, Elastic Overlock Stitch or Elastic Shell Tuck Stitch. 2. Position the fabric under the presser foot so that the seamline (or arrowhead point) is approximately 3 mm (1/8") to the left of the center of the presser foot. This stitch works best with a seam allowance of approximately 6 mm (1/4") as this allows the right (zigzag) side of the stitch to overlock the cut edge of the fabric as shown in fig. A. 3. If the seam allowance is wider than the stitch pattern, trim away any excess fabric after stitching. A finished Elastic Overlock Stitch is shown in fig. B. When sewing the Slant Overlock Stitch, position the fabric so that its edge is on the left of the needle. (See fig. C) Estas puntadas se usan para juntar costuras y acabarlas en una sola operación. La puntada overlock elástica es ideal para coser tejidos elásticos. 1. Sitúe el selector de puntada en puntada peine, puntada overlock elástica o puntada ondas elástica. 2. Coloque el tejido debajo del prensatelas para que la línea de costura (con la puntada de flecha) quede unos 3 mm (1/8") a la izquierda del centro del prensatelas. Esta puntada da los mejores resultados con una tolerancia de costura de unos 6 mm (1/4") dado que así permite a la parte derecha (zigzag) de la puntada enganchar la orilla cortada del tejido tal como ilustrado en la fig. A. PUNTADAS INCORPORADAS A B C 48 BUILT-IN STITCHES 3. Si la tolerancia de costura es más ancha que la puntada, corte cualquier pedazo de tejido que sobre después de coser. En la fig. B, puede ver una puntada overlock elástica acabada. Cuando cosa la puntada overlock estrecha, ponga el tejido de forma que su borde quede a la izquierda de la aguja. (Ver la fig. C)
-
 1
1 -
2
-
3
-
4
-
5
-
6
-
7
-
8
-
9
-
10
-
11
-
12
-
13
-
14
-
15
-
16
-
17
-
18
-
19
-
20
-
21
-
22
-
23
-
24
-
25
-
26
-
27
-
28
-
29
-
30
-
31
-
32
-
33
-
34
-
35
-
36
-
37
-
38
-
39
-
40
-
41
-
42
-
43
-
44
-
45
-
46
-
47
-
48
-
 49
49 -
 50
50 -
 51
51 -
 52
52 -
 53
53 -
 54
54 -
 55
55 -
 56
56 -
 57
57 -
 58
58 -
 59
59 -
60
-
61
-
62
-
63
-
64
-
65
-
66
-
67
-
68
-
69
-
70
-
71
-
72
-
73
-
74
-
75
-
76
-
77
-
78
-
79
-
80
-
81
-
82
-
83
-
84
-
85
-
86
-
87
-
88
-
89
-
90
-
91
 |
 |
