Brother International PS-2300 Users Manual - English - Page 59
Brother International PS-2300 Manual
 |
View all Brother International PS-2300 manuals
Add to My Manuals
Save this manual to your list of manuals |
Page 59 highlights
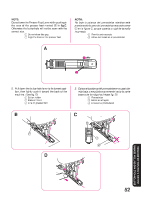
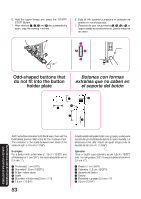
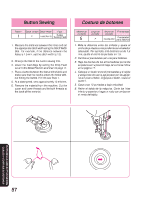
6. Hold the upper thread and press the "START/ STOP" Button. 7. After stitches 1, 2, 3 and 4 are automatically sewn, stop the sewing machine. 6. Coja el hilo superior y presione el pulsador de puesta en marcha/parada. 7. Después de que las puntadas 1, 2, 3 y 4 se hayan cosido automáticamente, pare la máquina de coser. 3 2 1 4 Odd-shaped buttons that do not fit into the button holder plate 1 4 Botones con formas extrañas que no caben en el soporte del botón 3 2 5 6 Add the button diameter to its thickness, then set the buttonhole presser foot scale to this measurement. The distance in the scale between two lines of the same length is 0.5 cm (13/64"). Example: For a button with a diameter of 1.5 cm (19/32") and a thickness of 1 cm (3/8"), the scale should be set at 2.5 cm (1"). 1 2 3 4 5 6 Thickness [1 cm (3/8")] Diameter [1.5 cm (19/32")] Button holder plate Scale Diameter + thickness [2.5 cm (1")] 0.5 cm (13/64") Añada el diámetro del botón a su grosor y coloque la escala del prensatelas de ojales en esta medida. La distancia entre dos líneas de igual longitud de la escala es de 0,5 cm. (13/64") Ejemplo: Para un botón cuyo diámetro es de 1,5 cm (19/32") y de 1 cm de grosor (3/8"), la escala debe situarse en 2,5 cm (1"). 1 Grosor (1 cm (3/8")) 2 Diámetro (1,5 cm (19/32")) 3 Soporte del botón 4 Escala 5 Diámetro + grosor (2,5 cm (1")) 6 0,5 cm (13/64") BUTTONHOLE AND BUTTON SEWING OJALES Y COSTURA DE BOTONES 53
-
 1
1 -
2
-
3
-
4
-
5
-
6
-
7
-
8
-
9
-
10
-
11
-
12
-
13
-
14
-
15
-
16
-
17
-
18
-
19
-
20
-
21
-
22
-
23
-
24
-
25
-
26
-
27
-
28
-
29
-
30
-
31
-
32
-
33
-
34
-
35
-
36
-
37
-
38
-
39
-
40
-
41
-
42
-
43
-
44
-
45
-
46
-
47
-
48
-
49
-
50
-
51
-
52
-
53
-
 54
54 -
 55
55 -
 56
56 -
 57
57 -
 58
58 -
 59
59 -
 60
60 -
 61
61 -
 62
62 -
 63
63 -
 64
64 -
65
-
66
-
67
-
68
-
69
-
70
-
71
-
72
-
73
-
74
-
75
-
76
-
77
-
78
-
79
-
80
-
81
-
82
-
83
-
84
-
85
-
86
-
87
-
88
-
89
-
90
-
91
 |
 |
