Brother International PS-2300 Users Manual - English - Page 77
Brother International PS-2300 Manual
 |
View all Brother International PS-2300 manuals
Add to My Manuals
Save this manual to your list of manuals |
Page 77 highlights
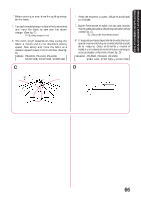
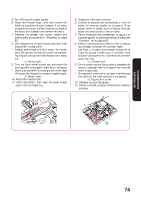
6. Remove the shuttle hook. (See fig. C) 7. Clean out lint and dust. * Use soft fabric to clean the shuttle hook. DO NOT oil the shuttle hook or shuttle race. (See fig. D) 4 Shuttle hook 5 Shuttle race 6. Retire el garfio de la lanzadera. Véase fig. C. 7. Limpie el polvo y las suciedades. * Utilice un trapo suave para limpiar el garfio de la lanzadera. NO ENGRASE el garfio de la lanzadera o la pista. Véase fig. D. 4 Garfio de la lanzadera 5 Pista de la lanzadera * DO NOT OIL. * NO LUBRICAR C D MANTENIMIENTO MAINTENANCE 4 5 8. Assemble the shuttle hook first then the needle plate. When installing the shuttle hook, be sure that the notch on the shuttle race is in the same position that it was when the shuttle hook was removed and that the projection on the shuttle hook aligns with the spring. Install the needle plate by sliding it to the left (the reverse of its removal procedure). 6 Notch on shuttle race 7 Projection 8 Spring 8. Monte el gancho de la lanzadera, y a continuación la placa de agujas. Al instalar el gancho de la lanzadera, asegúrese de que la muesca que hay en la pista de la lanzadera sigue en la misma posición en que estaba cuando se retiró el gancho de la lanzadera, y asegúrese de que la proyección sobre el gancho de la lanzadera está alineada con el muelle. Coloque la placa de agujas deslizándola hacia la izquierda (en el sentido opuesto a cuando la retiró). 6 Muesca en la pista de la lanzadera 7 Proyección 8 Muelle 6 7 8 71
-
 1
1 -
2
-
3
-
4
-
5
-
6
-
7
-
8
-
9
-
10
-
11
-
12
-
13
-
14
-
15
-
16
-
17
-
18
-
19
-
20
-
21
-
22
-
23
-
24
-
25
-
26
-
27
-
28
-
29
-
30
-
31
-
32
-
33
-
34
-
35
-
36
-
37
-
38
-
39
-
40
-
41
-
42
-
43
-
44
-
45
-
46
-
47
-
48
-
49
-
50
-
51
-
52
-
53
-
54
-
55
-
56
-
57
-
58
-
59
-
60
-
61
-
62
-
63
-
64
-
65
-
66
-
67
-
68
-
69
-
70
-
71
-
 72
72 -
 73
73 -
 74
74 -
 75
75 -
 76
76 -
 77
77 -
 78
78 -
 79
79 -
 80
80 -
 81
81 -
 82
82 -
83
-
84
-
85
-
86
-
87
-
88
-
89
-
90
-
91
 |
 |
