Brother International SE600 Operation Manual - Page 50
Satin stitching using the sewing speed, controller
 |
View all Brother International SE600 manuals
Add to My Manuals
Save this manual to your list of manuals |
Page 50 highlights
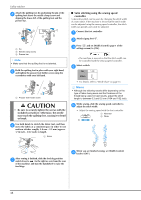
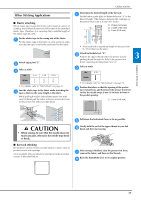
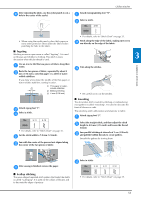
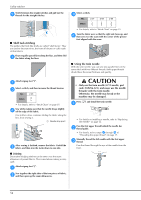
Utility stitches Attach the quilting foot by positioning the pin of the d quilting foot above the needle clamp screw and aligning the lower-left of the quilting foot and the presser bar. a a c b c b 1 Pin 2 Needle clamp screw 3 Presser bar Note • Make sure that the quilting foot is not slanted. Hold the quilting foot in place with your right hand, e and tighten the presser foot holder screw using the screwdriver with your left hand. 1 Presser foot holder screw CAUTION • Be sure to securely tighten the screws with the included screwdriver. Otherwise, the needle may touch the quilting foot, causing it to bend or break. Use both hands to stretch the fabric taut, and then f move the fabric at a consistent pace in order to sew uniform stitches roughly 2.0 mm - 2.5 mm (approx. 1/16 inch - 3/32 inch) in length. 1 Stitch a ■ Satin stitching using the sewing speed controller A decorative stitch can be sewn by changing the stitch width of a satin stitch. If the machine is set so that the stitch width can be adjusted using the sewing speed controller, the stitch width can quickly and easily be adjusted. Connect the foot controller. a Attach zigzag foot "J". b Press and set [Width Control] (page 1 of the c settings screen) to [ON]. → The machine is now set so that the stitch width can be controlled with the sewing speed controller. Select a stitch. d No. 1-28 Stitch • For details, refer to "Stitch Chart" on page 35. Memo • Although the stitching results differ depending on the type of fabric being sewn and the thickness of the thread being used, for best results, adjust the stitch length to between 0.3 and 0.5 mm (1/64 and 1/32 inch). While sewing, slide the sewing speed controller to e adjust the stitch width. • Adjust the sewing speed with the foot controller. 1 Narrower 2 Wider a b After sewing is finished, slide the feed dog position g switch lever to (to the right as seen from the rear of the machine) and turn the handwheel to raise the feed dogs. When you are finished sewing, set [Width Control] f back to [OFF]. 48
-
 1
1 -
2
-
3
-
4
-
5
-
6
-
7
-
8
-
9
-
10
-
11
-
12
-
13
-
14
-
15
-
16
-
17
-
18
-
19
-
20
-
21
-
22
-
23
-
24
-
25
-
26
-
27
-
28
-
29
-
30
-
31
-
32
-
33
-
34
-
35
-
36
-
37
-
38
-
39
-
40
-
41
-
42
-
43
-
44
-
 45
45 -
 46
46 -
 47
47 -
 48
48 -
 49
49 -
 50
50 -
 51
51 -
 52
52 -
 53
53 -
 54
54 -
 55
55 -
56
-
57
-
58
-
59
-
60
-
61
-
62
-
63
-
64
-
65
-
66
-
67
-
68
-
69
-
70
-
71
-
72
-
73
-
74
-
75
-
76
-
77
-
78
-
79
-
80
-
81
-
82
-
83
-
84
-
85
-
86
-
87
-
88
-
89
-
90
-
91
-
92
-
93
-
94
-
95
-
96
-
97
-
98
-
99
-
100
 |
 |
